Welcome to TECH LOGICS! If you’re ready to transform your home with smart lighting, you’ve picked the perfect starting point. In this detailed guide, we’ll walk you through every step of setting up the Philips T Beam Smart WiFi LED using the Wiz Connected app. From unboxing to creating the perfect ambiance, we’ll ensure you can control your lights effortlessly and tailor your lighting to any mood or occasion. Let’s dive into the world of smart lighting and get started!
What’s Inside the Box?
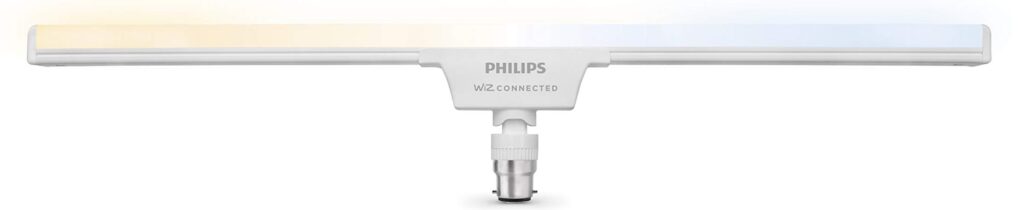
When you unbox your Philips T Beam Smart WiFi LED, you’ll find:
- Philips T Beam Smart LED: Equipped with a B22 base, ready to fit most standard light sockets.
- User Manual: A handy guide with setup instructions and a QR code to download the Wiz Connected app.
- No Extra Accessories Needed: Everything you need to get started is included, making setup straightforward.
Before proceeding, ensure you have a stable WiFi connection (preferably 2.4GHz, as this is required for setup) and a smartphone or tablet to run the Wiz Connected app.
Why Choose the Philips T Beam Smart WiFi LED?
This smart LED isn’t just a light bulb—it’s a gateway to a customizable lighting experience. Here’s why it stands out:
- Tunable White Light: With 64,000 shades of white, ranging from cozy warm (2700K) to crisp cool (6500K), you can set the perfect tone for any moment—whether it’s a relaxing evening or a focused workspace.
- Seamless Control: Use the Wiz Connected app for precise adjustments or simply toggle the wall switch for basic on/off functionality.
- Smart Home Integration: Compatible with Amazon Alexa, Google Assistant, and other smart home ecosystems, allowing hands-free voice control.
- Wide Illumination: Its 2-foot light spread is ideal for larger spaces like living rooms, dining areas, or open-plan kitchens.
- Energy Efficiency: LED technology ensures low power consumption while delivering bright, vibrant light.
Prerequisites for a Smooth Setup
To avoid hiccups during setup:
- Positioning: Place the LED light within 5-10 feet of your WiFi router during initial configuration to ensure a strong signal.
- Power Source: Ensure the light is connected to a compatible socket (B22 base) and powered on.
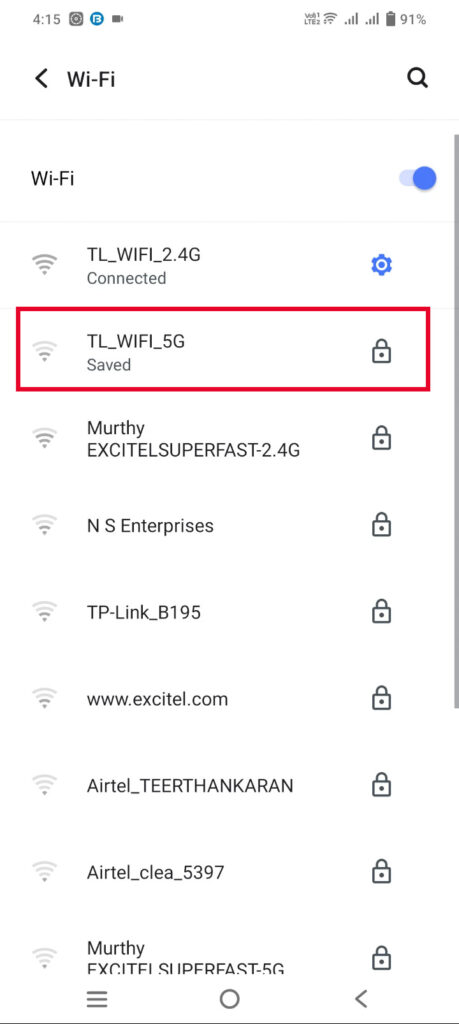
- WiFi Network: Confirm your router supports a 2.4GHz band, as the Philips T Beam does not connect to 5GHz networks during setup.
- Smartphone: Have your iOS or Android device ready with a stable internet connection.
Once setup is complete, you can relocate the light to your desired location without affecting its functionality.
Step-by-Step Setup Guide
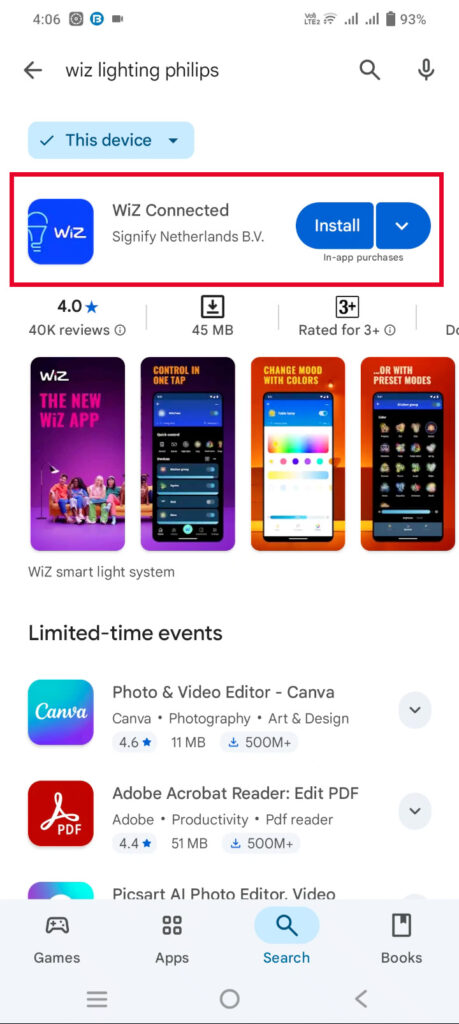
Step 1: Download and Install the Wiz Connected App
The Wiz Connected app is your control hub for the Philips T Beam Smart LED. Here’s how to get it set up:
- Find the App:
- Open the user manual and locate the QR code. Scan it with your smartphone’s camera or a QR code scanner to be redirected to the app store.
- Alternatively, manually search for “WIZ Connected” in the Google Play Store (Android) or Apple App Store (iOS). Ensure the app is developed by Signify Netherlands B.V.
- Install the App:
- Tap “Install” and wait for the download to complete. A stable WiFi or mobile data connection will speed up this process (typically 1-2 minutes).
- If you encounter slow download speeds, double-check your internet connection or try switching to a stronger network.
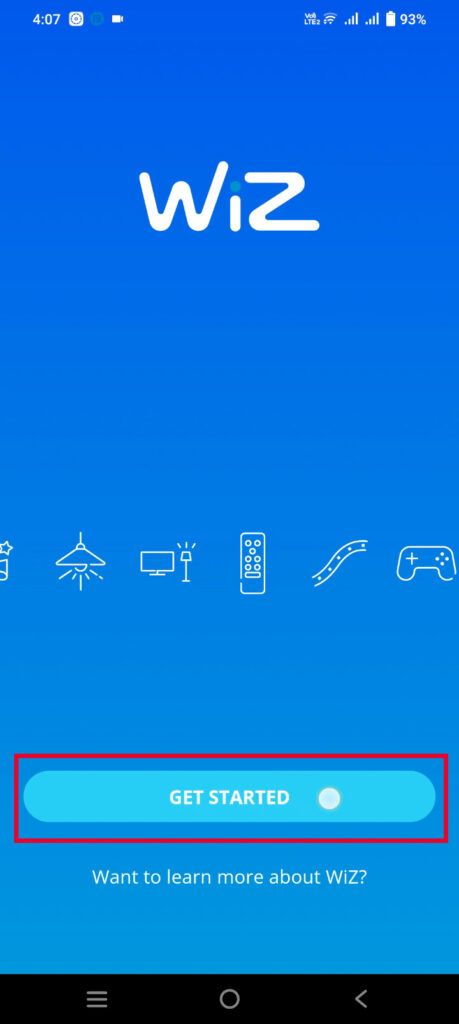
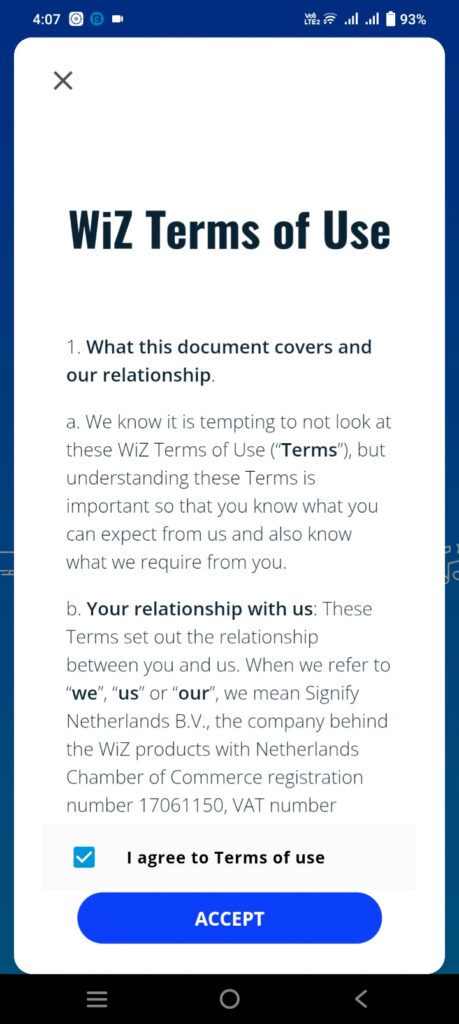
- Open the App:
- Launch the Wiz Connected app. You’ll be greeted with the Terms of Use and Privacy Policy. Take a moment to review these documents for clarity on data usage and app permissions.
- Tap “Continue” to accept the terms and move forward.
Step 2: Account Setup or Guest Mode
To proceed, you’ll need to either sign in or set up a profile:
- Existing Wiz Users:
- Sign in with your Wiz account credentials or use single-sign-on options like Google or Facebook for convenience.
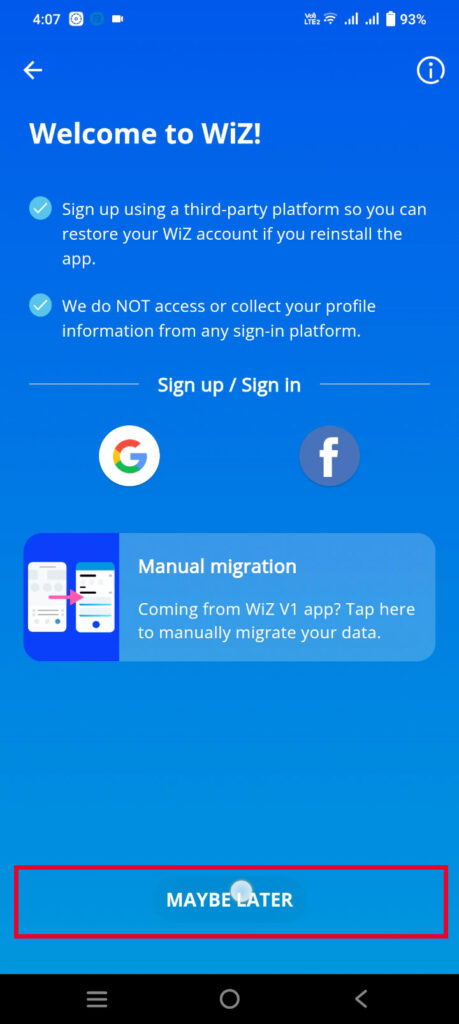
- New Users:
- If you prefer to skip account creation, select “Maybe Later” to proceed as a guest. Note that creating an account allows you to save your settings and control lights remotely across devices.
- Profile Creation:
- Enter a nickname (e.g., “Suresh Kumar C”) to personalize your app experience.
- Optionally, upload an avatar to make your profile visually distinct.
- Tap “Next” to continue.

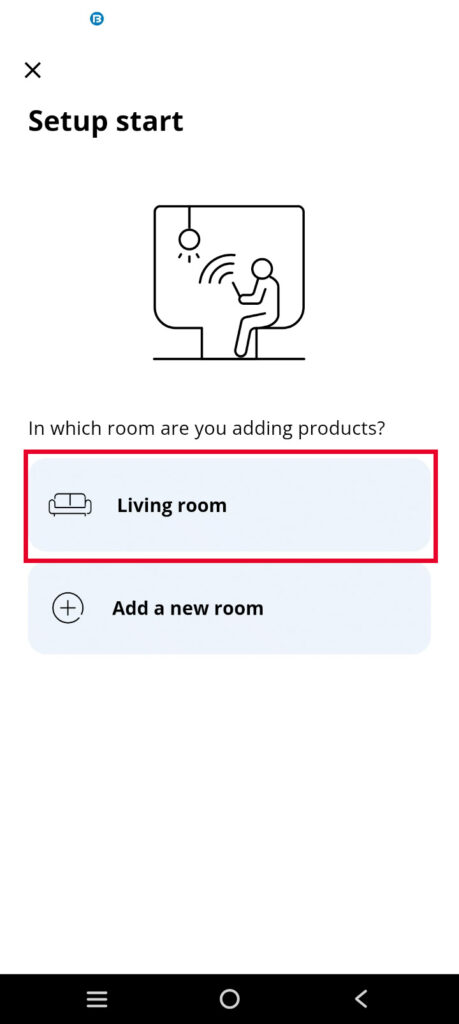
Step 3: Configure Your Virtual Home
The Wiz app organizes your devices into a virtual “home” for easy management:
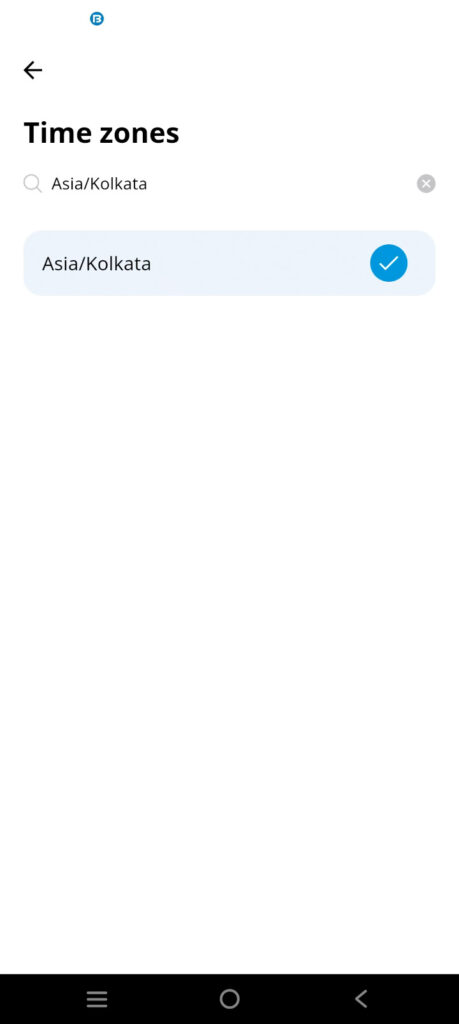
- Select Your Country:
- Choose your current location from the list to ensure region-specific settings, such as language and time zone, are applied correctly.
- Create a Home:
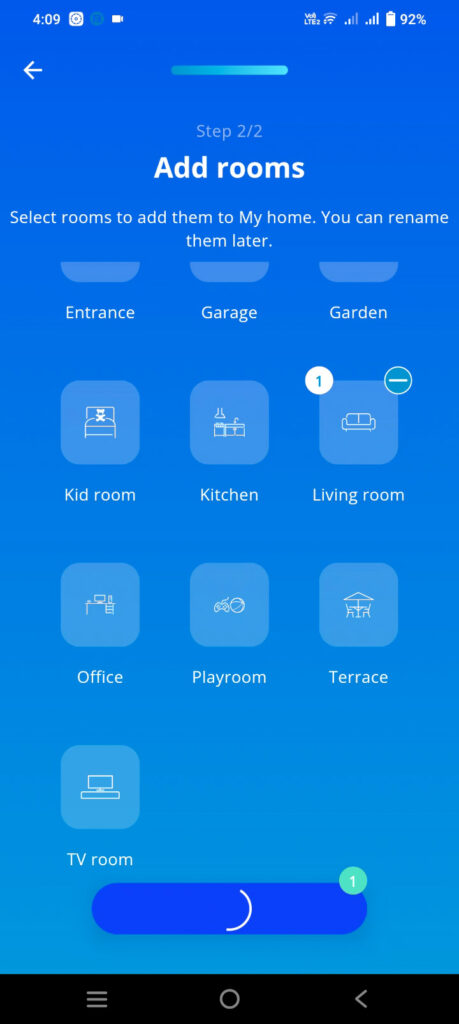
- Name your virtual home (e.g., “Cozy Cottage” or “City Apartment”). This acts as a central hub for all your smart devices.
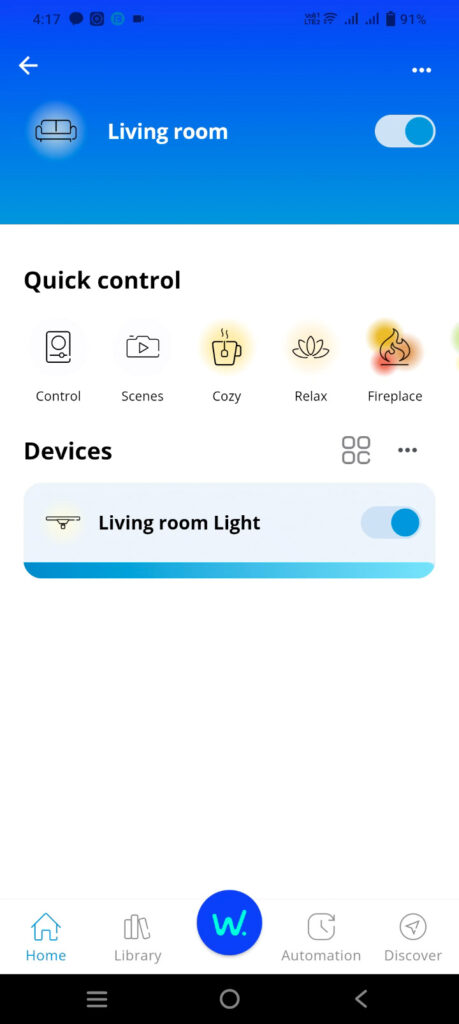
- Add rooms (e.g., “Living Room,” “Bedroom”) to organize your lights by location. This makes it easier to control specific areas of your house.
- Add the T Beam Light:
- Assign the light to a specific room for tailored control. For example, place it in “Living Room” to adjust settings for that space independently.
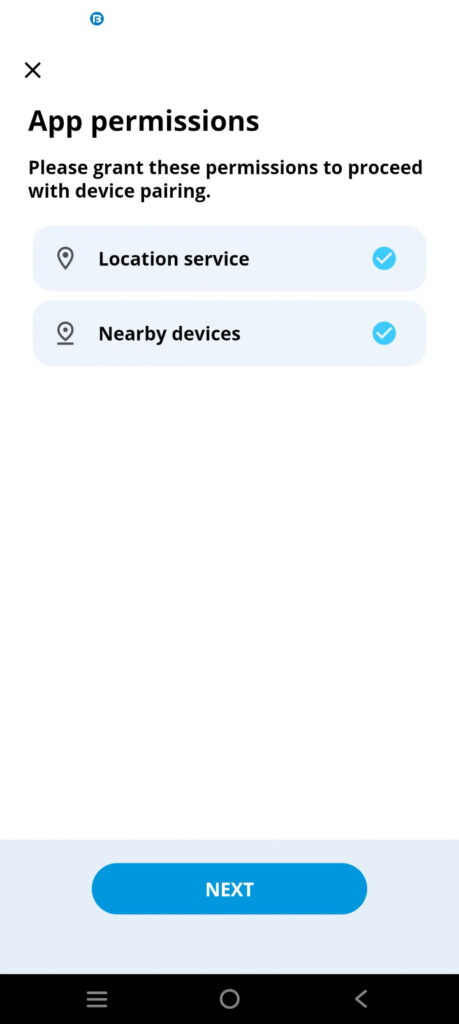
Step 4: Grant Necessary Permissions
For the app to detect and connect to your smart light:
- Enable Nearby Device Access: Allow the app to scan for nearby devices. This is essential for discovering the Philips T Beam LED.
- Turn On Location Services: Enable location permissions on your smartphone to help the app pinpoint the light’s location during setup.
- Tap “Next” to proceed after granting these permissions.
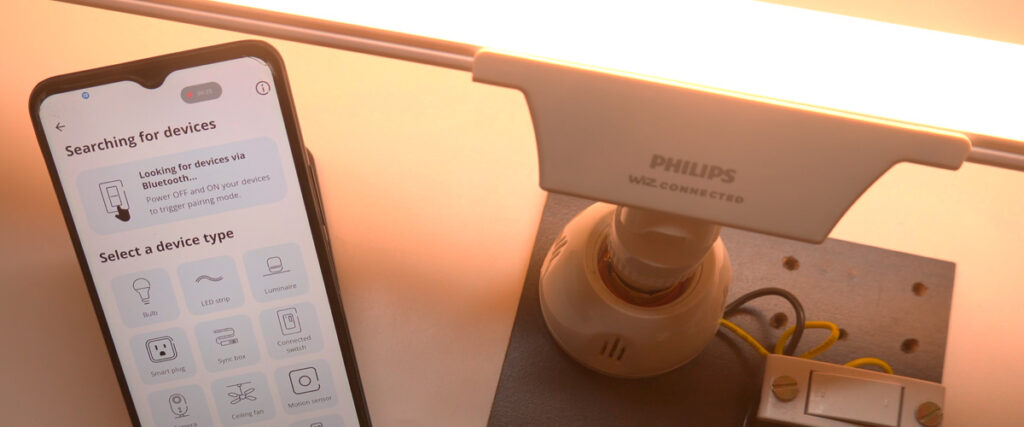
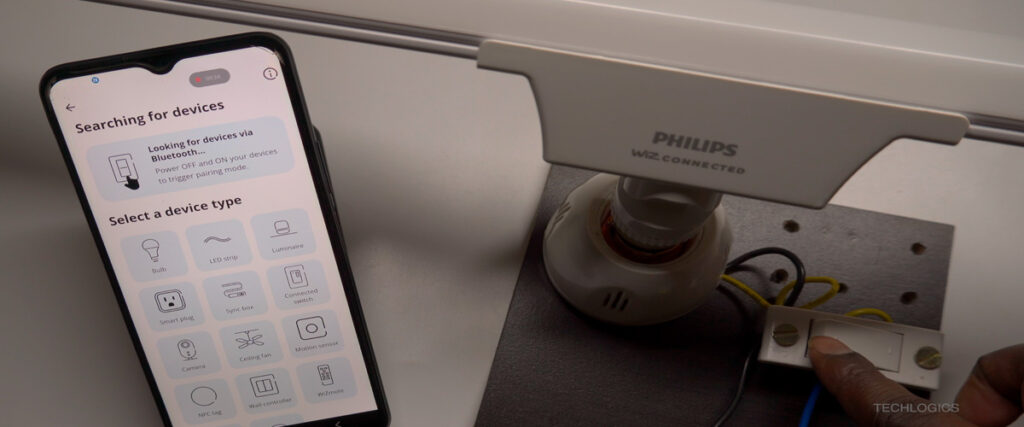
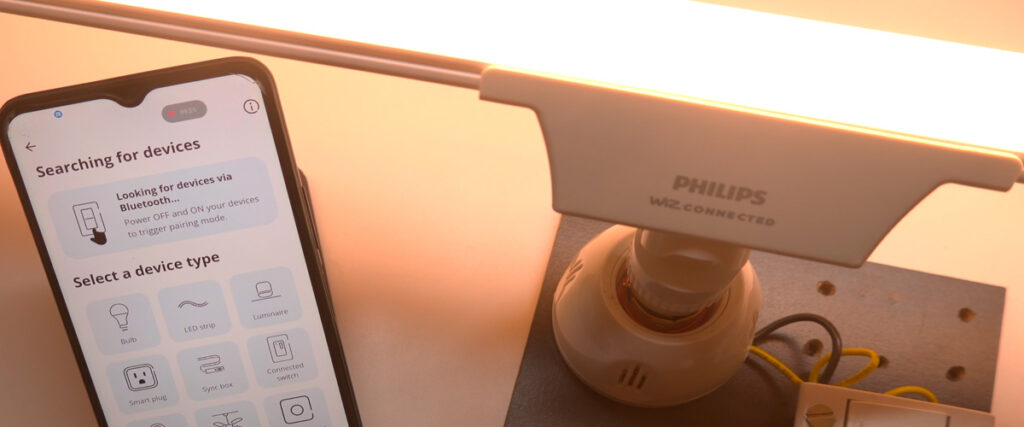
Step 5: Connect the Light to Your WiFi Network
Now, let’s pair the T Beam LED with your WiFi network:
- Position Devices:
- Ensure your smartphone, the LED light, and your WiFi router are within close proximity (ideally within 5-10 feet) to avoid connection issues.
- Power on the LED light by attaching it to a socket and flipping the switch.
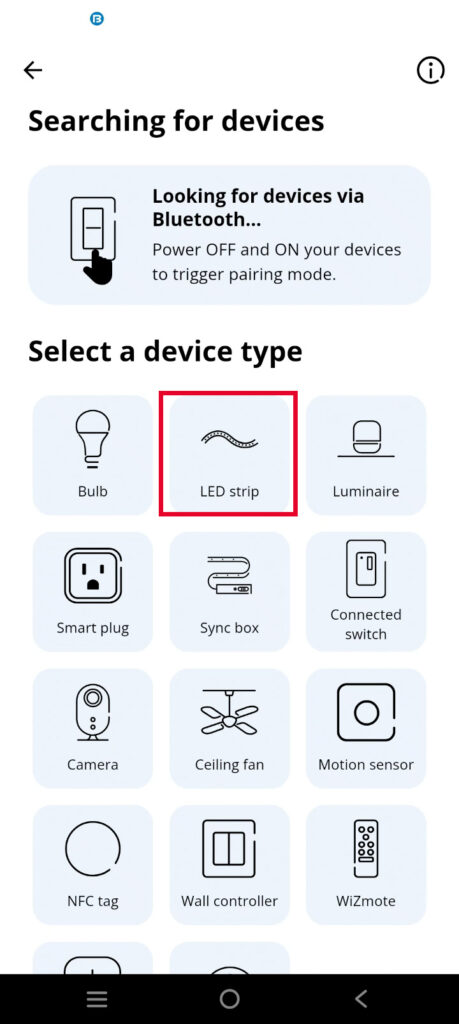
- Select Device Type:
- In the app, navigate to the “Select Device Type” page and choose “LED strip” (the category for the T Beamer light).
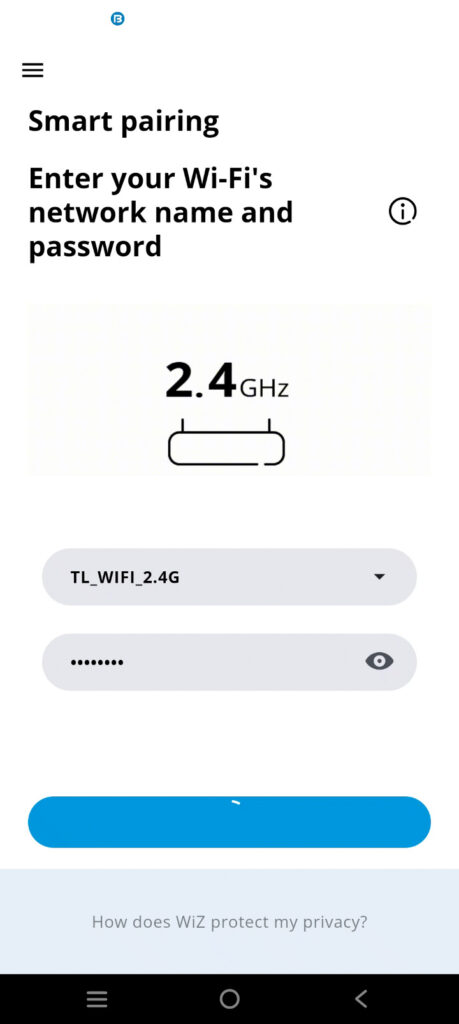
- Choose Your WiFi Network:
- Confirm your phone is connected to your router’s 2.4GHz WiFi network. Most modern routers have dual-band (2.4GHz and 5GHz) options—check your phone’s WiFi settings to ensure you’re on 2.4GHz.
- Enter your WiFi password in the app’s password field. Double-check for accuracy to avoid connection errors.
- Tap “Next” to continue.
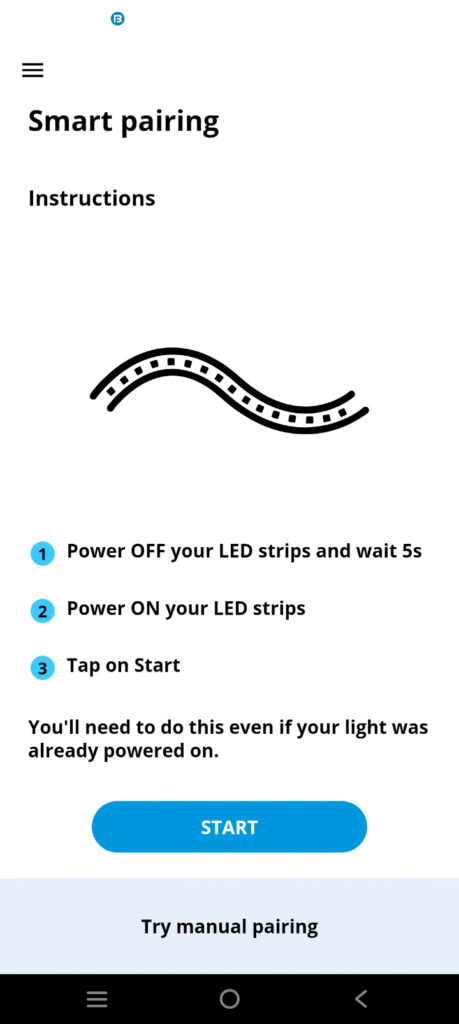
- Smart Pairing:
- On the smart pairing page, select “Yes, Brand New” since this is the first time configuring the light.
- Follow the app’s instructions: Power off the LED light, wait 5 seconds, then power it back on.
- Tap “Start” to initiate the pairing process.
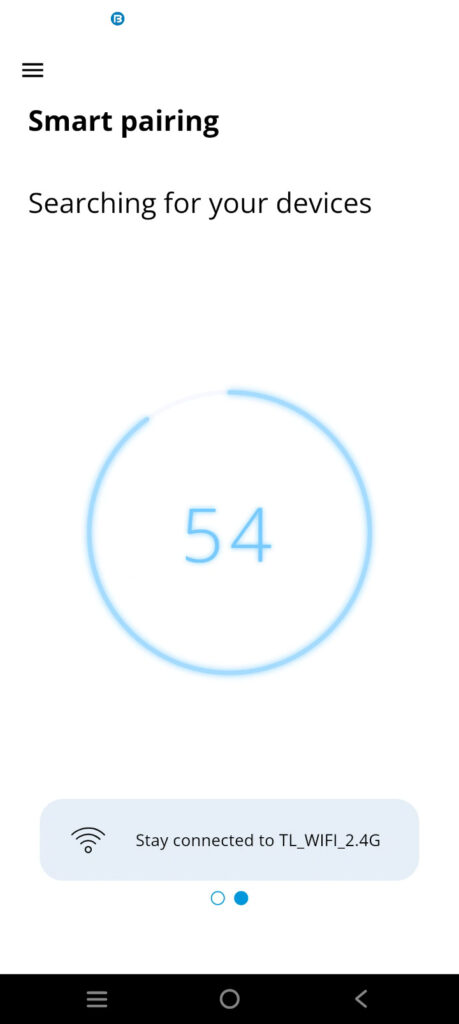
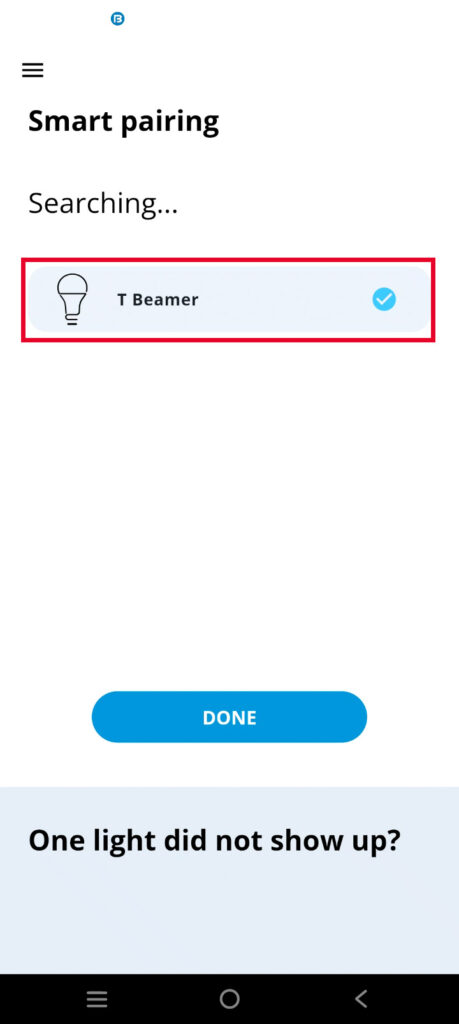
Step 6: Complete the Pairing Process
- The app will take approximately 60 seconds to connect the T Beam LED to your WiFi network and register it in the app.
- Once connected, the device will appear as “Beamer” in the app’s interface.
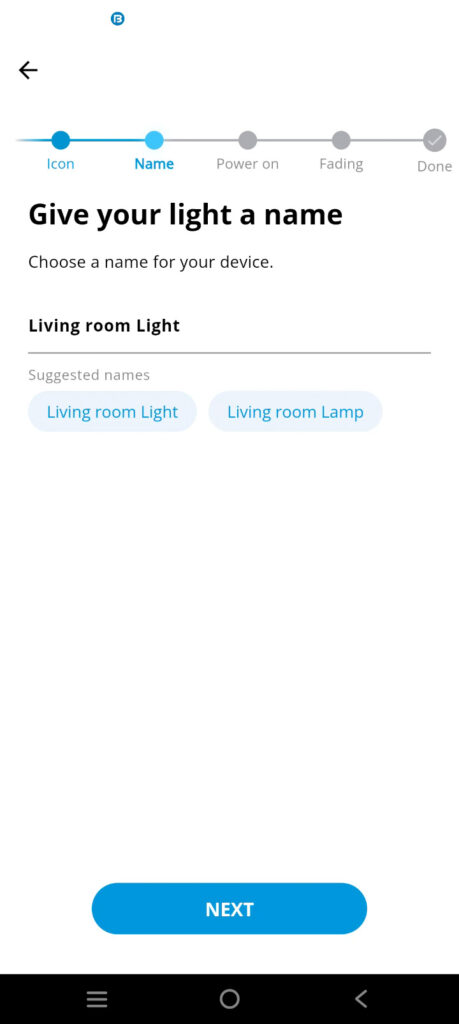
- Customize Your Light:
- Select an icon for the light (e.g., a bulb or strip icon) to make it easily recognizable.
- Assign a unique name, such as “Living Room Glow” or “Cozy Beam,” to personalize it.
- Additional Settings:
- Enable features like fade-in/fade-out effects for smooth transitions when turning the light on or off.
- Set schedules to automate lighting based on your daily routine (e.g., dim at 10 PM or brighten at 7 AM).
Enjoy Your Smart Lighting Experience
Your Philips T Beam Smart WiFi LED is now fully set up! With the Wiz Connected app, you can:
- Control Remotely: Adjust your lights from anywhere using WiFi or mobile data.
- Customize Ambiance: Experiment with 64,000 shades of white, tweak brightness, or switch between modes like “Relax” or “Focus.”
- Integrate with Smart Home Systems: Pair with Alexa or Google Assistant for voice commands like, “Hey Google, dim the living room light to 50%.”
The app’s intuitive interface makes it easy to create the perfect lighting for movie nights, dinner parties, or quiet evenings at home.

Troubleshooting Tips
If you encounter issues during setup:
- WiFi Connection: Ensure your phone and light are connected to the 2.4GHz band. If your router auto-switches bands, manually select 2.4GHz in your router settings.
- Light Not Detected: Power cycle the light (off for 5 seconds, then on) and restart the app.
- App Permissions: Verify that location services and nearby device access are enabled in your phone’s settings.
- Router Issues: Restart your router if the connection fails repeatedly.
What’s Next?
Want to unlock the full potential of your Philips T Beam Smart LED? Stay tuned for our upcoming guides, where we’ll explore:
- Voice Integration: How to connect your light to Alexa, Google Assistant, or other smart home platforms.
- Advanced Features: Setting up complex schedules, creating lighting scenes, and integrating with other Wiz-compatible devices.
- Energy-Saving Tips: Maximizing efficiency with smart lighting routines.
Check out our additional resources or subscribe to TECH LOGICS for in-depth tutorials and tech tips.
Final Thoughts
Congratulations on setting up your Philips T Beam Smart WiFi LED! You’re now equipped to transform your home’s lighting with ease and creativity. Whether you’re adjusting brightness for a cozy night in or setting schedules for daily convenience, this smart light offers endless possibilities.
If this guide helped you, please consider liking, sharing, or following TECH LOGICS. Your support fuels our passion for creating detailed, user-friendly tech tutorials. Thank you for being part of our community, and happy lighting!


