Welcome back to TECH LOGICS! Connecting third-party cameras like Prama (STQC Model) to a Hikvision NVR or DVR can often be a headache due to proprietary firmware differences. However, by enabling the ONVIF protocol and following a few crucial steps, you can achieve a quick and stable connection.
This step-by-step guide will walk you through the entire process, ensuring your Prama camera is properly configured and successfully added to your Hikvision recorder.
🛠️ Step 1: Essential Tools & Device Discovery
Before we start, you must have the necessary Prama software installed.
- Prama ODDT Tool: The Prama ODDT tool is essential! Unlike Hikvision’s SADP tool, which only detects Hikvision devices, the ODDT tool is designed to find, activate, and configure Prama devices, including the unique STQC-approved models.
- Web Plugin: Ensure the Prama web plugin is installed on your computer for browser access.
Once installed, open the ODDT tool. It will immediately detect and list all Prama cameras, making device management simple.
🔐 Step 2: Camera Activation and Login
If you are using a brand new Prama IP camera, you must activate it first. We will use a web browser for this process.
- Access the Web Interface: Open your web browser (Chrome or Edge) and enter the camera’s IP address.⚠️ Security Warning: If a security warning pops up, don’t worry. Click “Advanced” and then select “Proceed to the IP address”. This is common and safe for local network devices.
- Activate or Login: If the camera is not yet activated, the login page will prompt you to create a new password. Enter your desired password to create and activate the camera.
- Set Security Questions: You will be prompted to add security questions (e.g., “What’s your favorite camera model?”). This feature is highly recommended for easy password recovery in the future.
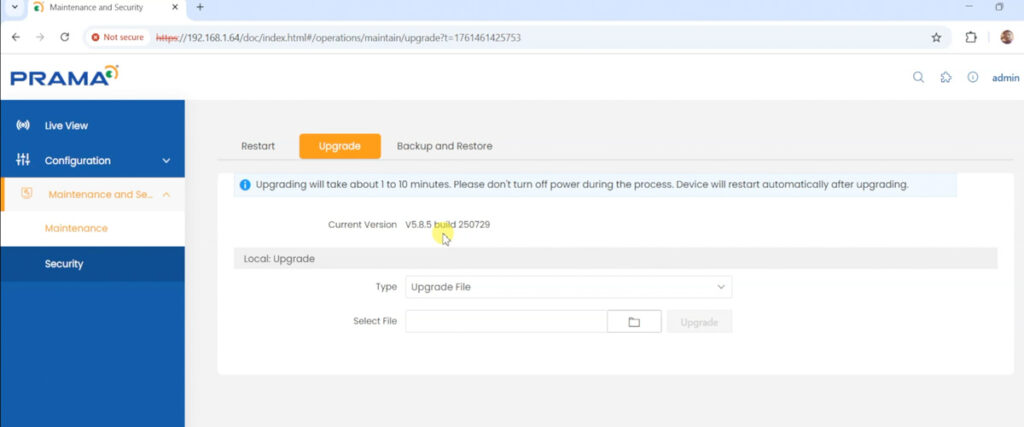
⬆️ Step 3: Crucial Firmware Upgrade (if needed)
To unlock network services and access advanced features—including the required security settings—you must ensure your camera’s firmware is up to date.
- Check Current Version: Navigate to the main configuration page and go to the “System” page to check the current firmware version.
- Upgrade Requirement: If your firmware version is below or the same as V5.8.5 build, you must upgrade it to the latest version.
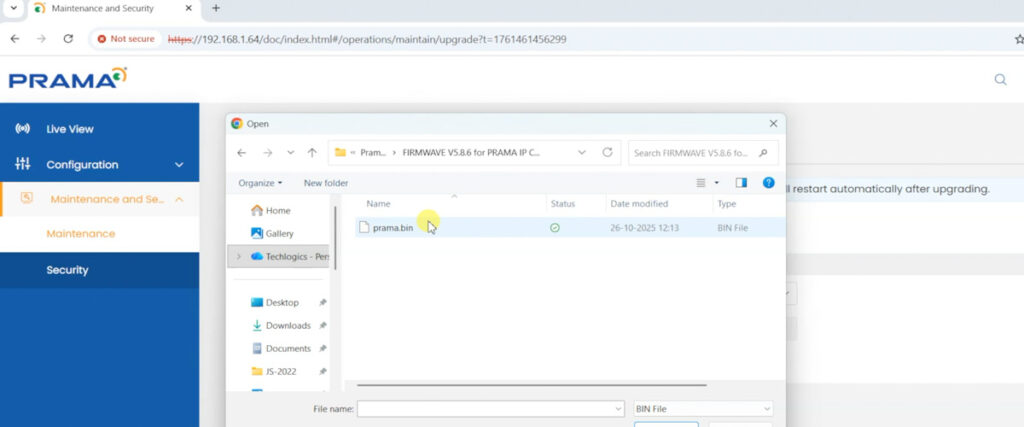
- Perform the Upgrade:
- Navigate to the Maintenance page and find the Local Upgrade tab.
- Click the folder icon to browse for and select the firmware file you’ve downloaded.
- Click the Upgrade button.
- Reboot and Verify: The camera will automatically reboot after the upgrade. Log back in with the camera’s IP and your admin credentials to verify the new firmware.
Download Firmware PT-NC123D3-WNM(D2)
Download Firmware PT-NC123D3-N(D2)

🌐 Step 4: Configure Fixed IP and Network Security
For a stable surveillance setup, a fixed IP is highly recommended. You will also configure necessary security settings for third-party integration.
A. Set Fixed IP Address (Highly Recommended)
- Go to the Configuration menu, then the Network tab.
- Disable the DHCP option.
- Manually enter a fixed IP address that fits your local network requirements.
- The camera will reboot to apply the new, fixed IP address, which you must use for all future access.

B. Secure Network Services
The following steps are essential for secure and compatible third-party communication.
- Navigate to Configuration > Network > Network Service.
- HTTPS Tab:
- Under the “HTTP Authorization” menu, set Digest Algorithms to “MD5/SHA256”.
- Click Save.
- RTSP Tab:
- Under the “RTSP Authorization” menu, set Digest Algorithms to “MD5/SHA256”.
- Click Save.


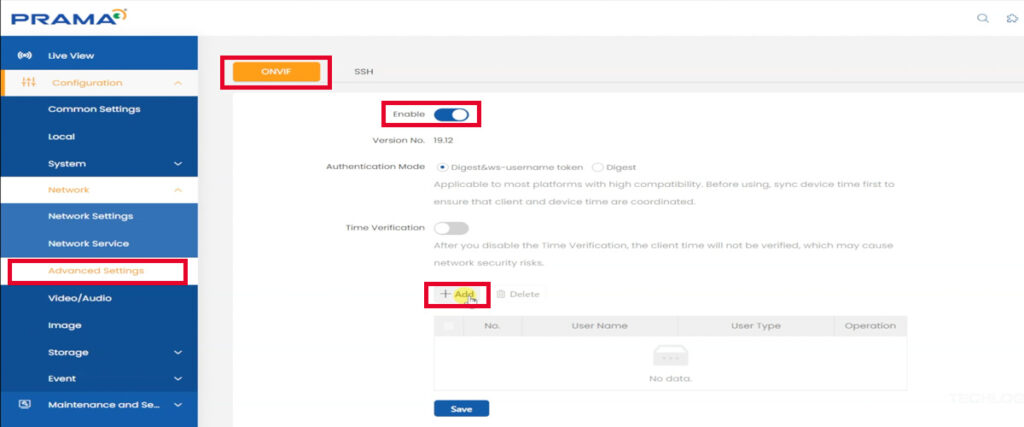
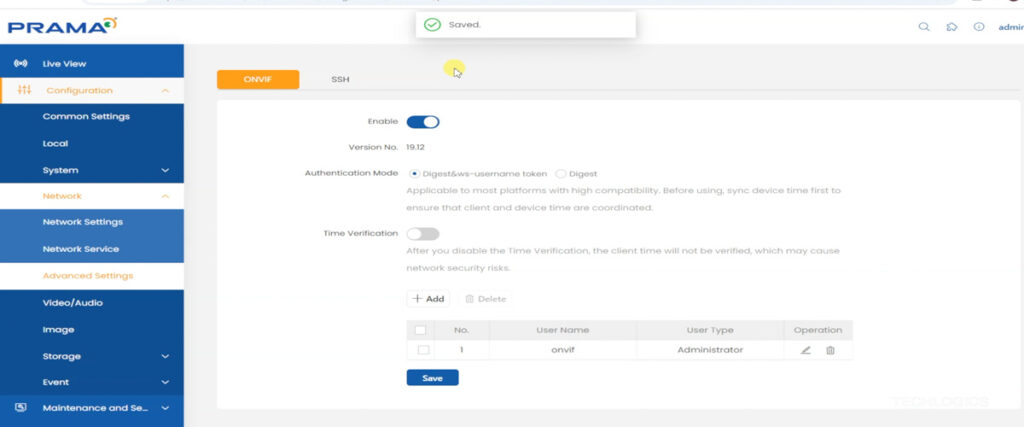
✅ Step 5: Enable ONVIF and Create a Dedicated User
The final configuration step is to activate the ONVIF protocol and create a separate user account for your Hikvision recorder.
- Go to Configuration > Network > Advanced Settings.
- Locate and enable the ONVIF feature toggle.
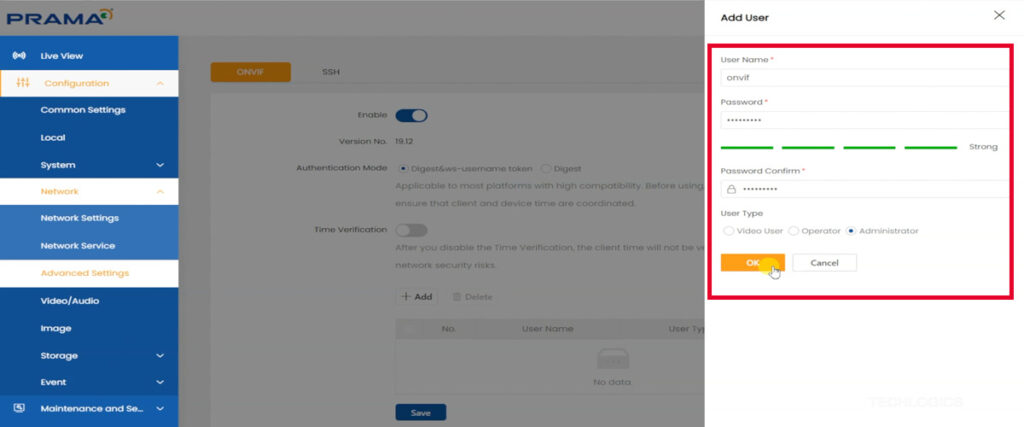
- Click the “Add” button to create a dedicated ONVIF user account.
- Enter a Username and a strong, complex password.
- Set the user as “Administrator” to ensure seamless integration.
- Save all your configuration changes.
Your Prama camera is now ready to reliably communicate with your Hikvision NVR/DVR!
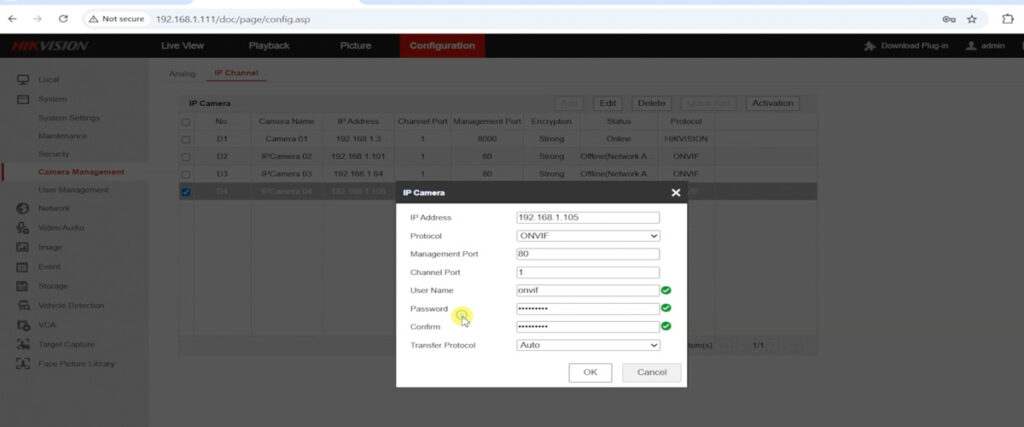
🔌 Step 6: Add the Prama Camera to the Hikvision Recorder
You can now add the ONVIF-enabled Prama camera to your Hikvision NVR or DVR via the device’s monitor interface or web browser.
- Access Camera Management: Go to the camera management or IP channel section of your recorder’s system.
- Quick Add (Automatic Detection):
- Select the “Quick Add” option.
- If the NVR/DVR detects an ONVIF-enabled camera on the network, it will often recognize and add the camera automatically.
- Manual Add (If Quick Add Fails):
- Click the “Add” button.
- Set the Protocol to “ONVIF”.
- Enter the Prama camera’s Fixed IP Address.
- Set the management port to “80” (or the custom port if changed).
- Input the Username and Password you created specifically for the ONVIF user in Step 5.
- Click “OK” to save and connect.
A “Status: Online” indicator confirms your Prama camera is successfully integrated and ready for live viewing and recording!

Found this guide helpful for your security setup? Like, share, and subscribe to TECH LOGICS for more valuable tips and tutorials!


