In this vibrant and informative tutorial, we will guide you through the process of reading air quality data using the SDS011 Sensor alongside an Arduino Uno, all displayed beautifully on a 4-line LCD screen. Perfect for enthusiasts and environmental advocates alike, this project not only enhances your technical skills but also contributes to a better understanding of the air quality around you.
🌬️ What It’s All About: Understanding Air Quality Monitoring
With increasing concerns about air pollution and its effects on health, monitoring air quality has never been more important. This tutorial is designed for both enthusiasts and those keen on environmental monitoring. By the end of this guide, you’ll have the skills to set up your Arduino and SDS011 sensor for accurate air quality readings!
🔌 Connecting the Nova PM Sensor SDS011 to Arduino Uno
Let’s break down the connection process step-by-step:
- 📡 Initialize the Sensor:
- Configure your Arduino code by setting the RX and TX pins to Digital Pin 2 and Digital Pin 3.
- Ensure the RX pin connects to Digital Pin 2 and the TX pin connects to Digital Pin 3. Refer to the accompanying diagram for visual guidance!
- 🔋 Power Supply:
- The SDS011 requires a 5V power supply. You can draw power from the Arduino Uno.
- Connect the 5V wire from the sensor to the 5V pin on the Arduino, and the GND wire to any GND pin available. Alternatively, feel free to utilize a separate 5V power supply.

💡 Wiring the I2C LCD Display
To connect the I2C LCD display, follow these guidelines:
- SDA (Data Line): Connect this to A4 on the Arduino for data transfer.
- SCL (Clock Line): Connect this to A5 on the Arduino, ensuring accurate clock signal transmission.
Additionally, ensure that the display has power:
- Connect the VCC pin to the 5V output on the Arduino.
- Attach the GND pin to the Arduino’s ground (GND). This guarantees that your I2C LCD is powered and ready to communicate!

🖥️ Setting Up Your Arduino IDE
Let’s jump into uploading the code!
- 🌐 Connect Your Arduino:
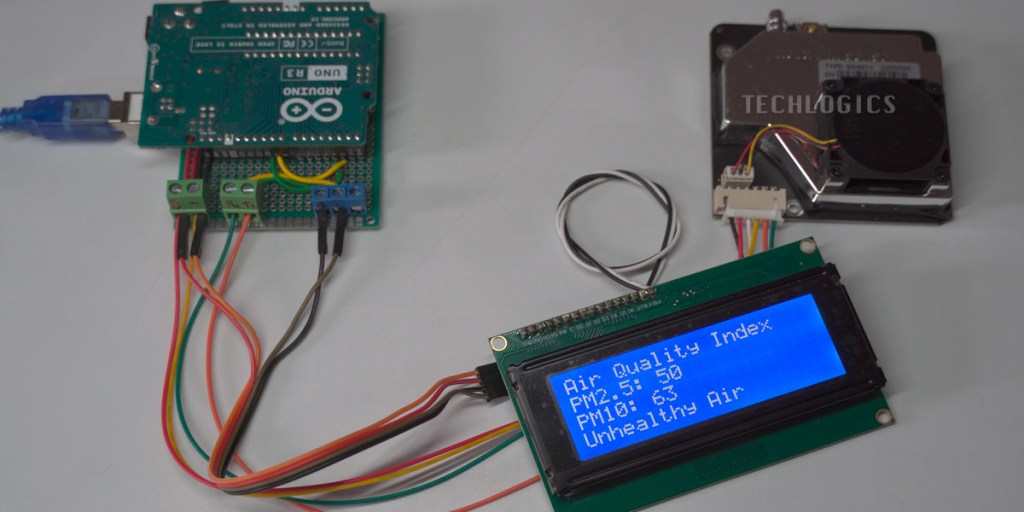
Use a USB cable to connect the Arduino Uno to your PC or laptop where the Arduino IDE is installed. Once connected, the Uno will power the sensor. Look out for the fan spinning, a flashing red LED, and a glowing LCD backlight—they’re all signs that your setup is working properly! - 📥 Open the Arduino IDE:
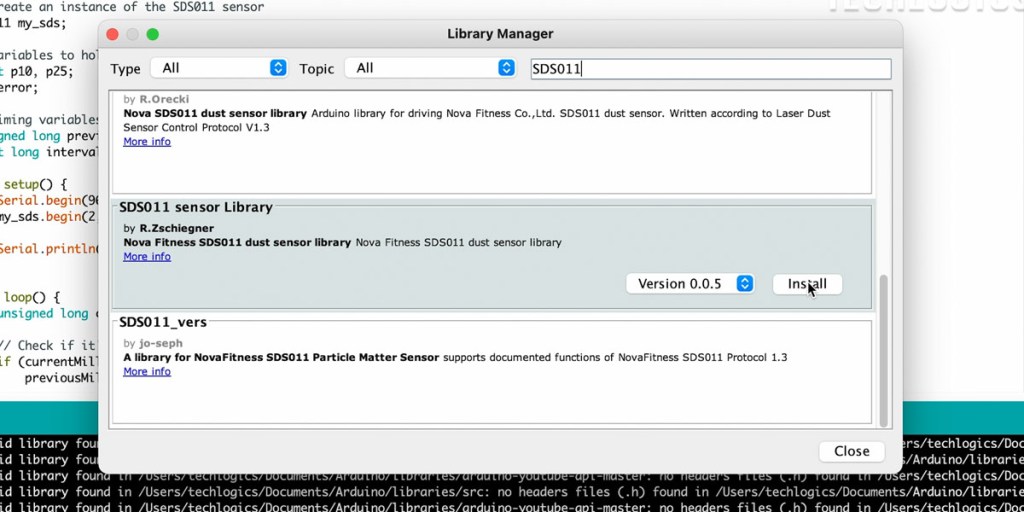
Launch the IDE and load the educational code provided below. This code is specifically crafted for the SDS011 and requires the SDS011 library to function correctly.
#include <SDS011.h>
#include <Wire.h>
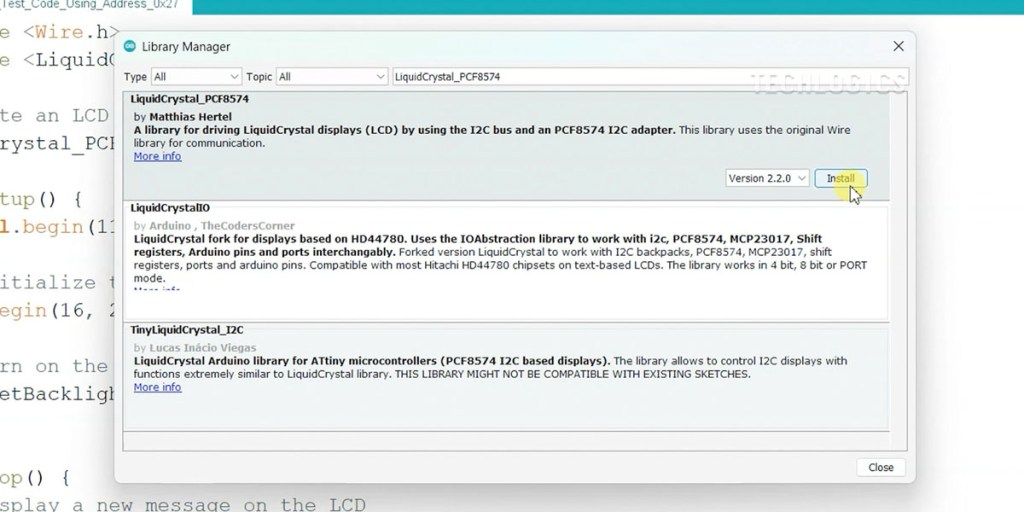
#include <LiquidCrystal_PCF8574.h>

// Create an instance of the SDS011 sensor
SDS011 my_sds;

// Variables to hold PM10 and PM2.5 values
float p10, p25;
int error;

// Timing variables
unsigned long previousMillis = 0; // Store the last time we read the sensor
const long interval = 10000;      // Interval in milliseconds (10 seconds)

// Create LCD object with I2C address
LiquidCrystal_PCF8574 lcd(0x27); // Adjust the address if necessary

void setup() {
    Serial.begin(9600);                // Start Serial Monitor at 9600 bps
    my_sds.begin(2, 3);                // Initialize SDS011 with RX on Digital Pin 2, TX on Digital Pin 3
    lcd.begin(20, 4);                  // Initialize the LCD with 20 columns and 4 rows
    lcd.setBacklight(255);             // Turn on the backlight

    Serial.println("SDS011 Sensor Initialized.");
    delay(2000);                       // Delay to read the message
    lcd.clear();                       // Clear the display
}

void loop() {
    unsigned long currentMillis = millis(); // Get the current time

    // Check if it's time to read the sensor
    if (currentMillis - previousMillis >= interval) {
        previousMillis = currentMillis; // Save the last read time

        // Attempt to read from SDS011
        error = my_sds.read(&p25, &p10); // Read PM2.5 and PM10 values

        if (error == 0) {                // Check for successful reading
            Serial.print("P2.5: ");
            Serial.println(p25);
            Serial.print("P10:  ");
            Serial.println(p10);

            // Display values on the LCD
            lcd.setCursor(0, 0);         // Move to the first row
            lcd.print("Air Quality Index"); // Display "Air Quality Index"

            lcd.setCursor(0, 1);         // Move to the second row
            lcd.print("PM2.5: ");        // Display PM2.5 label with "PM"
            lcd.print((int)p25);         // Show PM2.5 value as an integer

            lcd.setCursor(0, 2);         // Move to the third row
            lcd.print("PM10: ");         // Display PM10 label with "PM"
            lcd.print((int)p10);         // Show PM10 value as an integer

            // Display air quality status on the fourth row
            lcd.setCursor(0, 3);         // Move to the fourth row
            if (p25 < 25) {
                lcd.print("Good Air       "); // Display good air quality
            } else if (p25 < 50) {
                lcd.print("Moderate Air   "); // Display moderate air quality
            } else if (p25 < 100) {
                lcd.print("Unhealthy Air   "); // Display unhealthy air quality
            } else {
                lcd.print("Hazardous Air   "); // Display hazardous air quality
            }

        } else {
            Serial.print("Error reading from SDS011, error code: ");
            Serial.println(error); // Print the error code
            lcd.setCursor(0, 0);     // Move to the first row
            lcd.print("Error: ");     // Display error label
            lcd.print(error);         // Show error code
            lcd.print("   ");         // Clear old characters
        }
    }

    // Optional: A short delay can be added here if needed to reduce CPU usage
    delay(100); // Adjust this delay if necessary
}

// I2C Connections:
// A4 -> SDA (Data Line) connected to LCD I2C Module
// A5 -> SCL (Clock Line) connected to LCD I2C Module
📚 Installing the Required Libraries
To ensure that your IDE is equipped with the necessary tools, follow these steps:
- Go to Sketch > Include Library > Manage Libraries.
- In the Library Manager, search for “SDS011” and “LiquidCrystal_PCF8574”, then click on the Install button for each library.


⚙️ Selecting the Correct Board and Port
Before uploading, verify your settings:
- Navigate to Tools > Board > Arduino Uno.
- Under Port, choose the appropriate one (you may see “COM3” or “COM4” on Windows, or “/dev/tty.usbmodem” on macOS).
After confirming, click the checkmark (✓) to compile your code. If all appears well, click the right arrow (→) to upload the code to your Arduino Uno.
Main points about the provided Arduino code for reading air quality data using the SDS011 sensor:
Initialization:
- The code initializes the SDS011 sensor and the I2C LCD display, preparing the system for operation by setting up the necessary parameters and communication protocols.
my_sds.begin(2, 3); // Initialize SDS011 with RX on Digital Pin 2, TX on Digital Pin 3
lcd.begin(20, 4);   // Initialize the LCD with 20 columns and 4 rows
Routine Data Reading:
- The code implements a timed routine to read particulate matter concentrations (PM2.5 and PM10) from the SDS011 sensor every 10 seconds using the
millis()function for effective time tracking.
if (currentMillis - previousMillis >= interval) {
    previousMillis = currentMillis; // Save the last read time
    error = my_sds.read(&p25, &p10); // Read PM2.5 and PM10 values
}
Real-time Data Display:
- The collected PM values are displayed on a 4-line LCD in real-time. The output includes the air quality index and classifications based on the PM2.5 value, providing immediate feedback on air quality.
lcd.print("PM2.5: ");
lcd.print((int)p25);
User Interface and Feedback:
- The interface on the LCD is designed to present information clearly, with labels for readings and an air quality status based on PM2.5 concentrations. This enhances usability and understandability for users monitoring air quality.
if (p25 < 25) {
    lcd.print("Good Air");
} else if (p25 < 50) {
    lcd.print("Moderate Air");
} else {
    lcd.print("Hazardous Air");
}
📊 Displaying Real-Time Sensor Data
Once the code is uploaded, your Arduino will start monitoring air quality! Sensor values for PM2.5 and PM10 will be displayed on the LCD in real-time, updated every 10 seconds.

💡 Display Features:
- The LCD will show “Air Quality Index” followed by PM values and a classification of air quality (from “Good Air” to “Hazardous Air”) based on PM2.5 levels.
📢 Stay Connected!
Make sure to follow TechLogics for more updates and advanced options to display sensor values on a variety of platforms. If you found value in this tutorial, please support us by liking, sharing, and subscribing! Your engagement allows us to continue creating valuable content—thank you for being a part of the TechLogics community! 🌟


