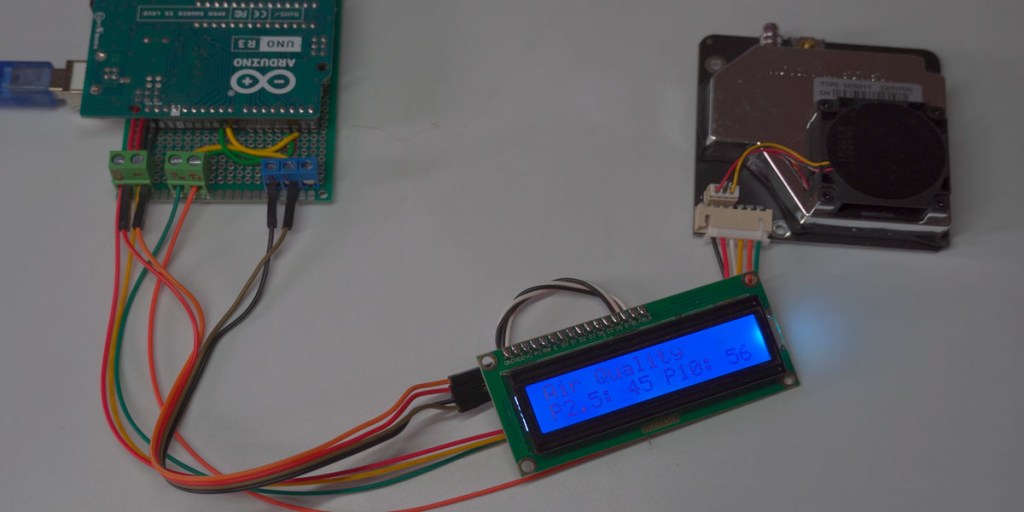
How to read air quality monitoring data and display the readings on an LCD as part of our air quality sensor series. We’ll specifically demonstrate how to connect and read the sensor values of the Nova PM Sensor SDS011 using an Arduino Uno along with a 2-line LCD display.
Understanding the Nova PM Sensor SDS011
This powerful sensor allows us to detect particulate matter in the air, providing crucial insights into air quality. Whether you’re a hobbyist or someone looking to understand environmental monitoring, this tutorial is perfect for you. So, let’s get started and learn how to set up your Arduino and SDS011 sensor for accurate air quality readings!
Connections Made Simple
Connecting the Nova PM Sensor SDS011
- Wiring the Sensor: Connecting the Nova PM Sensor SDS011 to the Arduino Uno is straightforward. In your Arduino code, initialize the sensor by setting the RX and TX pins to Digital Pin 2 and Digital Pin 3, respectively.
- Establish Serial Communication: Ensure the RX pin connects to Digital Pin 2 for receiving data, while the TX pin connects to Digital Pin 3 for sending data, as illustrated in the accompanying diagram.
- Power Supply: The sensor requires a 5V power supply, which can be conveniently provided by the Arduino Uno. Connect the sensor’s 5V wire to the 5V pin on the Arduino and the GND wire to one of the GND pins.
- Alternative Power Option: If preferred, you can also use a separate 5V power supply for the sensor.

Setting Up the I2C LCD Display
- Wiring the I2C LCD: For the I2C LCD connection, the display is wired to the Arduino using two main communication pins: the SDA (Data Line) and SCL (Clock Line).
- Connecting SDA and SCL: The SDA pin should connect to pin A4 on the Arduino, which is commonly designated for I2C data transfer on many boards, including the Arduino Uno. The SCL pin connects to pin A5, serving as the clock signal for the I2C communication protocol.
- Power Connections: The I2C LCD module also requires power connections to function properly. Connect the VCC pin on the LCD to the 5V output on the Arduino to ensure it receives adequate power, and connect the GND pin to the Arduino’s ground (GND) to complete the circuit.
- Communication Confirmation: This setup ensures that the I2C LCD can effectively communicate with the Arduino to display data.

Uploading the Code
- Connect the USB cable to the Arduino Uno, then plug the other end into your PC or laptop where the Arduino IDE is installed.
- Open the Arduino IDE and load the code provided below.
#include <SDS011.h>
#include <Wire.h>
#include <LiquidCrystal_PCF8574.h>

// Create an instance of the SDS011 sensor
SDS011 my_sds;

// Variables to hold PM10 and PM2.5 values
float p10, p25;
int error;

// Timing variables
unsigned long previousMillis = 0; // Store the last time we read the sensor
const long interval = 10000;      // Interval in milliseconds (10 seconds)

// Create LCD object with I2C address
LiquidCrystal_PCF8574 lcd(0x27); // Adjust the address if necessary

void setup() {
    Serial.begin(9600);                // Start Serial Monitor at 9600 bps
    my_sds.begin(2, 3);                // Initialize SDS011 with RX on Digital Pin 2, TX on Digital Pin 3
    lcd.begin(16, 2);                  // Initialize the LCD with 16 columns and 2 rows
    lcd.setBacklight(255);             // Turn on the backlight

    Serial.println("SDS011 Sensor Initialized.");
    delay(2000);                       // Delay to read the message
    lcd.clear();                       // Clear the display
}

void loop() {
    unsigned long currentMillis = millis(); // Get the current time

    // Check if it's time to read the sensor
    if (currentMillis - previousMillis >= interval) {
        previousMillis = currentMillis; // Save the last read time

        // Attempt to read from SDS011
        error = my_sds.read(&p25, &p10); // Read PM2.5 and PM10 values

        if (error == 0) {                // Check for successful reading
            Serial.print("P2.5: ");
            Serial.println(p25);
            Serial.print("P10:  ");
            Serial.println(p10);

            // Display values on the LCD
            lcd.setCursor(0, 0);         // Move to the first row
            lcd.print("Air Quality Index"); // Display "Air Quality Index"

            lcd.setCursor(0, 1);         // Move to the second row
            lcd.print("P2.5: ");         // Display PM2.5 label
            lcd.print((int)p25);         // Show PM2.5 value as an integer
            lcd.print(" P10: ");         // Display PM10 label
            lcd.print((int)p10);         // Show PM10 value as an integer
            lcd.print("   ");            // Clear old characters
        } else {
            Serial.print("Error reading from SDS011, error code: ");
            Serial.println(error); // Print the error code
            lcd.setCursor(0, 0);     // Move to the first row
            lcd.print("Error: ");     // Display error label
            lcd.print(error);         // Show error code
            lcd.print("   ");         // Clear old characters
        }
    }

    // Optional: A short delay can be added here if needed to reduce CPU usage
    delay(100); // Adjust this delay if necessary
}

// I2C Connections:
// A4 -> SDA (Data Line) connected to LCD I2C Module
// A5 -> SCL (Clock Line) connected to LCD I2C Module
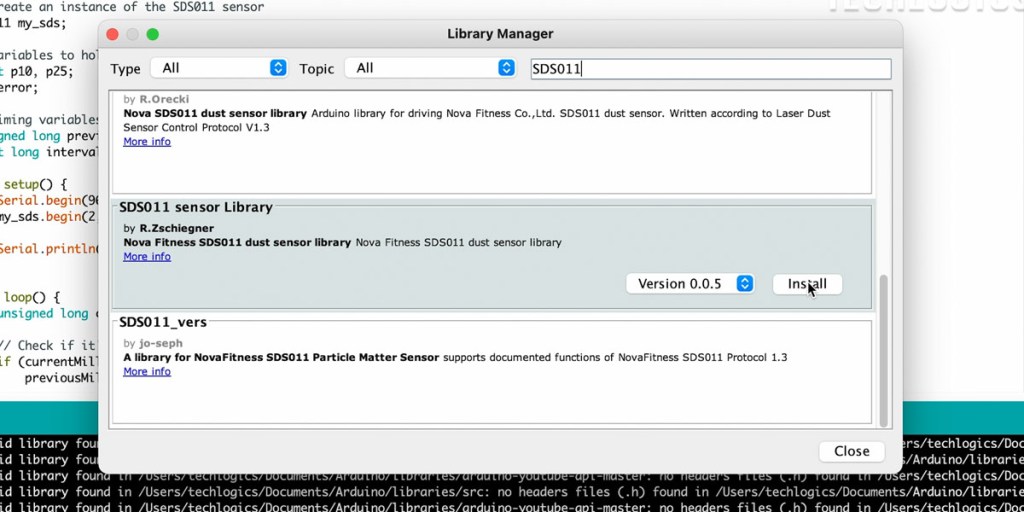
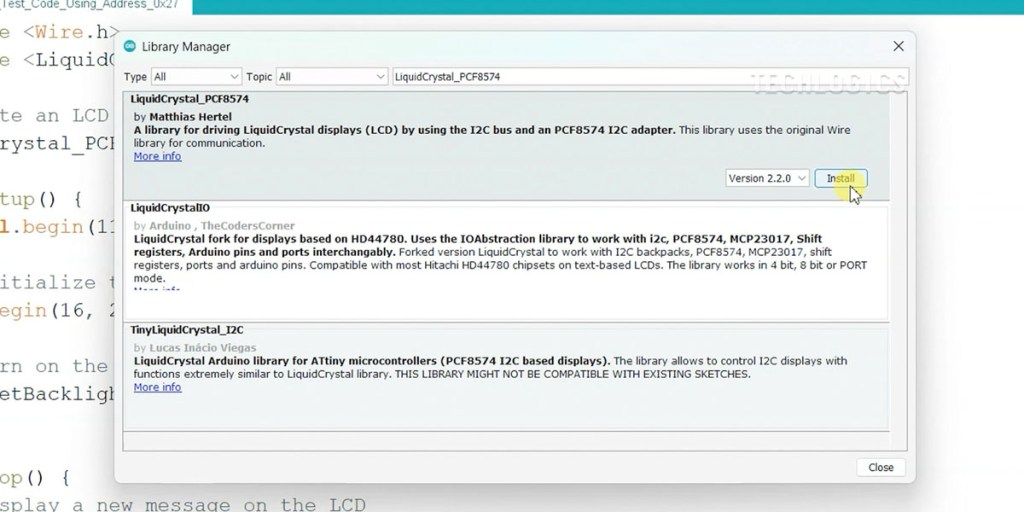
This code is specifically designed to work with the Nova PM Sensor SDS011 and requires the SDS011 library to function properly. To install the library, navigate to the Library Manager by clicking on Sketch in the top menu. Then select Include Library and choose Manage Libraries. In the Library Manager window, type “SDS011” and “LiquidCrystal_PCF8574” into the search bar. Once you find the libraries, click on the Install button to add them to your Arduino IDE.


Main points about the provided code for monitoring air quality with the Nova PM Sensor SDS011 and Arduino Uno, along with relevant code snippets:
Sensor and LCD Setup:
- The code initializes the SDS011 sensor and the I2C LCD. It sets the RX and TX pins for the sensor on Digital Pin 2 and Digital Pin 3, and configures the LCD for a 16×2 display format.
SDS011 my_sds; // Create an instance of the SDS011 sensor

void setup() {
    my_sds.begin(2, 3); // Initialize SDS011 with RX on Digital Pin 2, TX on Digital Pin 3
    lcd.begin(16, 2);   // Initialize the LCD with 16 columns and 2 rows
}
Reading Air Quality Data:
- The sensor reads PM2.5 and PM10 values every 10 seconds. This is managed through a timing mechanism that checks the elapsed time and prompts a new reading when the defined interval is reached.
const long interval = 10000; // Interval in milliseconds (10 seconds)

void loop() {
    unsigned long currentMillis = millis(); // Get the current time
    if (currentMillis - previousMillis >= interval) {
        previousMillis = currentMillis; // Save the last read time
        error = my_sds.read(&p25, &p10); // Read PM2.5 and PM10 values
    }
}
Displaying Readings:
- If the sensor successfully retrieves data, the PM2.5 and PM10 values are printed to both the Serial Monitor and the LCD display. This allows for real-time monitoring of air quality.
if (error == 0) { // Check for successful reading
    Serial.print("P2.5: ");
    Serial.println(p25);
    lcd.setCursor(0, 1); // Move to the second row of the LCD
    lcd.print("P2.5: ");
    lcd.print((int)p25); // Show PM2.5 value as an integer
    lcd.print(" P10: ");
    lcd.print((int)p10); // Show PM10 value as an integer
}

Follow our website for updates and advanced options to display sensor values on different platforms. If you found this video helpful, please support us by liking, sharing, and subscribing. Your engagement helps us create valuable content—thank you for your support!


