Hello everyone! Welcome to our detailed guide on manually configuring the Hi-Focus HF-CPE01 for outdoor point-to-point connectivity using a PC or laptop. In our previous tutorial, we explored the auto-bridging method—a fast and simple setup option. However, if you’re looking for a more secure connection or the auto-bridge isn’t performing as expected, this step-by-step manual configuration process is for you. We’ll walk you through setting up one CPE as an Access Point (AP) and another as a Client, perfect for applications like installing a CCTV camera in a lift or extending internet connectivity between locations.
This setup eliminates the need for complex cabling, offering a straightforward installation process. Whether you’re enhancing surveillance coverage or ensuring reliable internet in hard-to-reach areas, this guide has you covered. Let’s dive in!

Getting Started: Connecting the CPE to Your PC
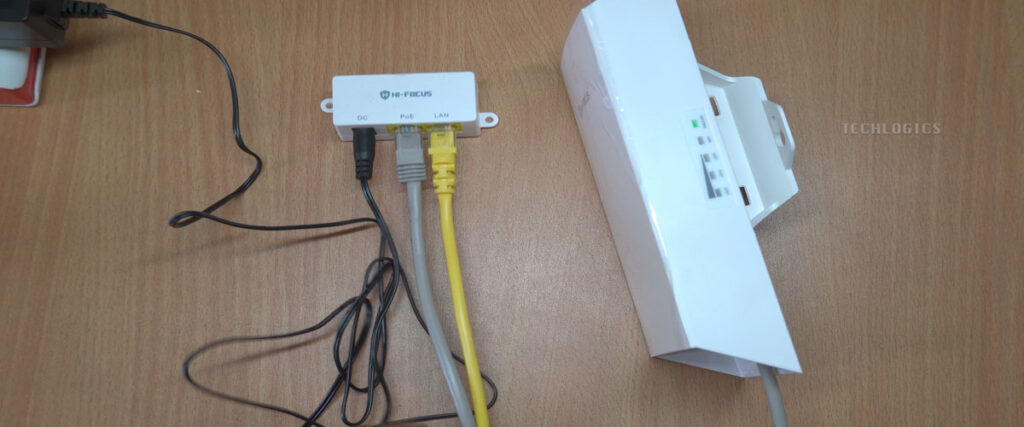
To configure the Hi-Focus HF-CPE01, begin by powering it on and connecting it to your PC. You have two connection methods:
- Using the Power Adapter:
- Power the CPE with the provided adapter.
- Connect a LAN cable from the CPE’s LAN port to your PC’s LAN port.
- Using the PoE Splitter:
- Connect the PoE splitter’s PoE port to the CPE’s LAN port.
- Link the splitter’s LAN port to your PC’s LAN port.
- Plug the provided DC adapter into the splitter’s DC port to power the CPE.
Both methods establish a reliable connection, enabling you to access and configure the CPE efficiently.

Configuring the First CPE as an Access Point (AP)
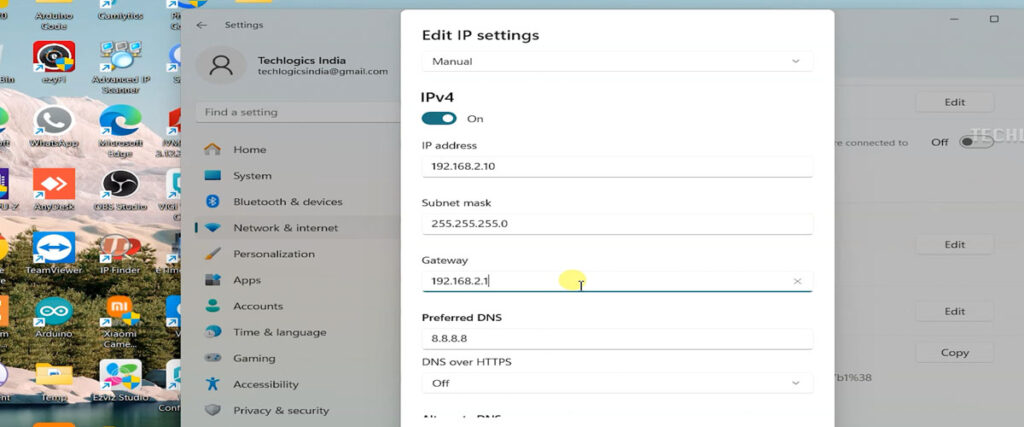
Step 1: Set a Static IP on Your PC
To access the CPE’s web interface, assign a static IP to your PC’s LAN adapter:
- Right-click the ‘Network Icon’ in the system tray or go to ‘Network and Internet Settings.’
- Select ‘Ethernet’ to open network settings.
- In the IPv4 settings, configure:
- IP Address: 192.168.2.10
- Subnet Mask: 255.255.255.0
- Save the settings to allow your PC to communicate with the CPE.
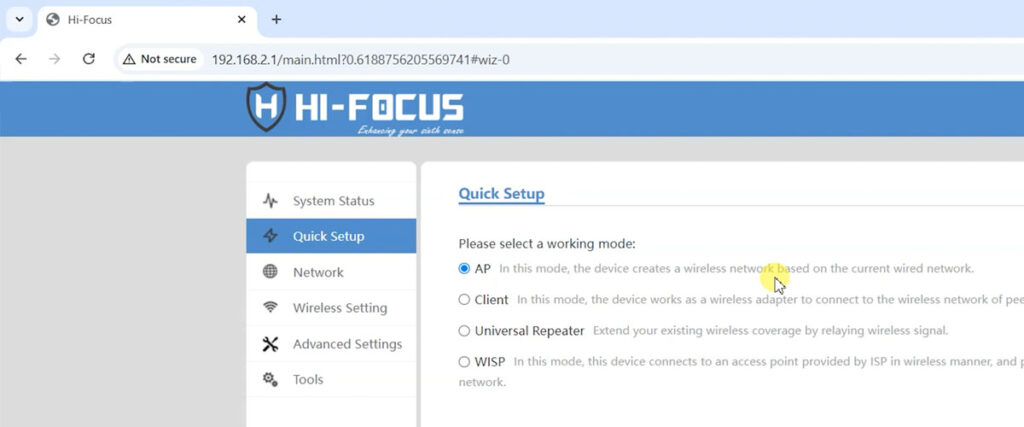
Step 2: Access the Web Interface
- Open a web browser (e.g., Chrome, Firefox, or Edge).
- Type the default IP address http://192.168.2.1 into the address bar and press Enter.
- Log in with the default credentials:
- Username: admin
- Password: admin
- Click ‘Login’ to enter the ‘Quick Setup’ menu.

Step 3: Set Up the Access Point
- In ‘Quick Setup,’ select the ‘AP’ option to configure the CPE as a transmitter.
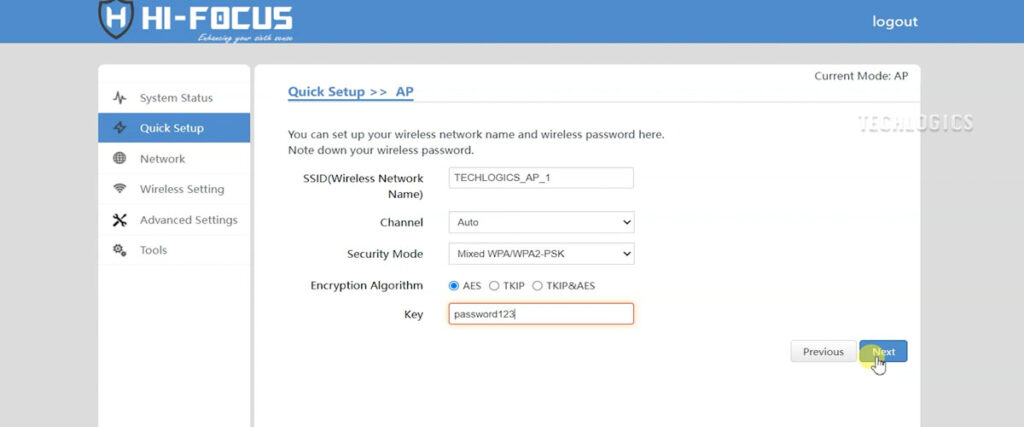
- Click ‘Next’ to access the ‘Wireless AP Settings’ page.
- SSID: Enter a recognizable WiFi name (e.g., “BlockA_AP” for Block A cameras). A descriptive SSID simplifies managing multiple devices across locations.
- Security: Choose ‘WPA-PSK’ and set a strong, memorable password (you’ll need this for the Client CPE).
- Click ‘Next,’ then ‘Save.’ The CPE will reboot, taking 1-2 minutes.
Step 4: Adjust Network Settings (Optional)
- After rebooting, log back in to verify the AP configuration.
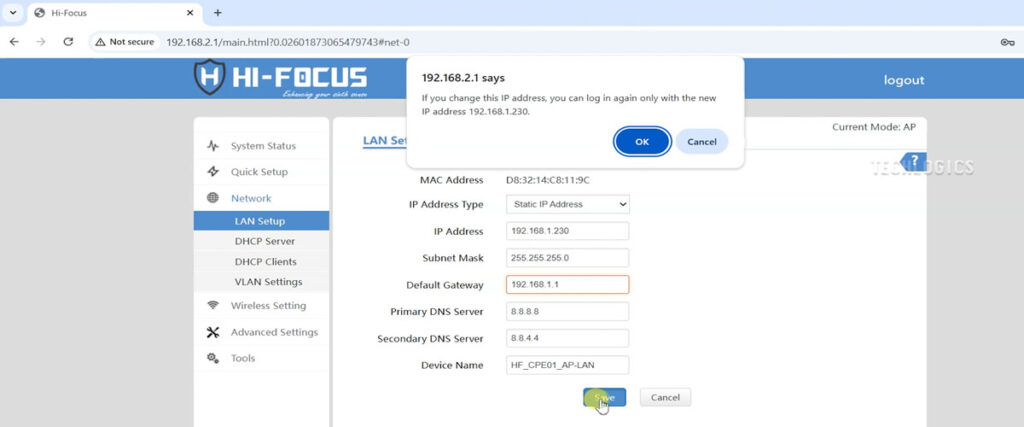
- If your home network uses a different IP range (e.g., router IP is 192.168.1.1), adjust the CPE’s IP:
- Go to the ‘Network’ page > ‘LAN Setup.’
- Set the AP’s IP (e.g., 192.168.1.230), subnet mask, and gateway to match your network.
- Click ‘Save’ to apply the changes.
This adjustment allows easy access to the CPE from any device on your network without reconfiguring your PC’s IP later.
Done! Your Access Point is successfully configured.
Configuring the Second CPE as a Client (Receiver)
Step 1: Connect the Client CPE
- Power on the second CPE and connect its LAN port to your PC or laptop.
Step 2: Set a Static IP on Your PC
- Assign your PC’s LAN adapter a static IP compatible with the Client CPE’s default IP (192.168.2.1):
- IP Address: 192.168.2.10
- Subnet Mask: 255.255.255.0
Step 3: Access the Web Interface
- Open your browser and enter http://192.168.2.1.
- Log in with:
- Username: admin
- Password: admin
Step 4: Configure the Client
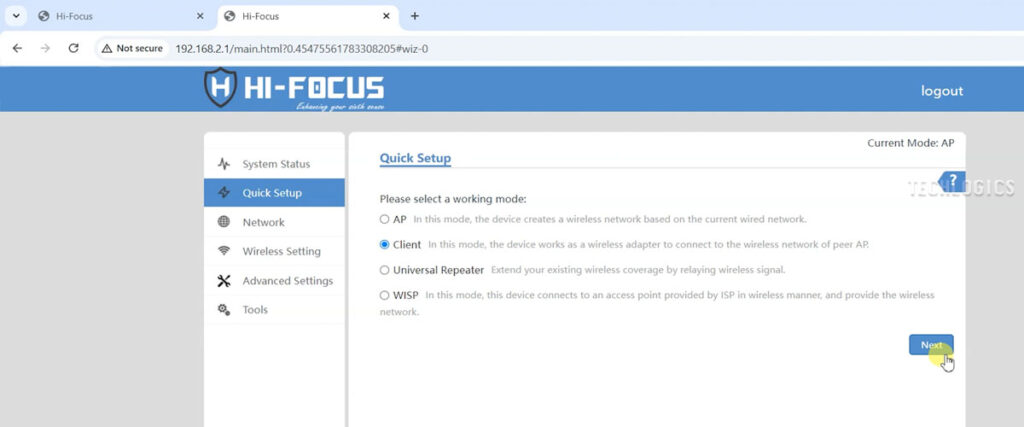
- In ‘Quick Setup,’ select ‘Client’ mode.
- Click ‘Next’ to reach the ‘Wireless Client Settings’ page.
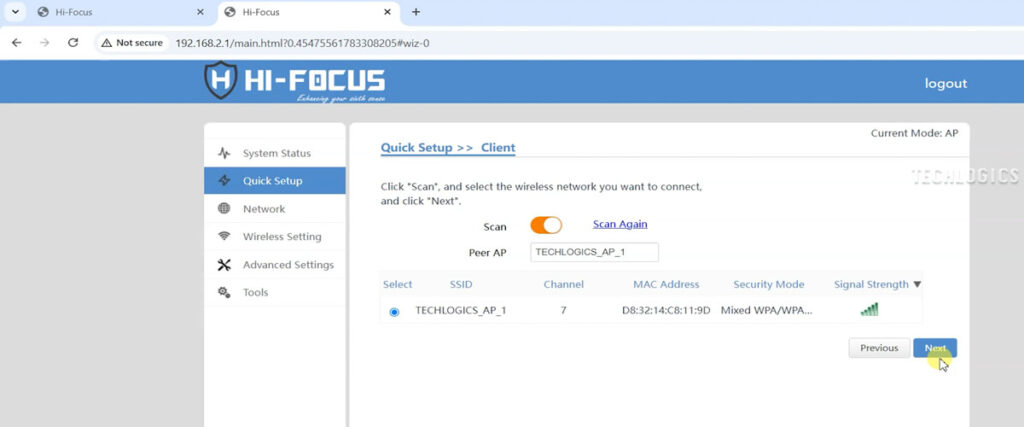
- Toggle ‘Scan’ to list available WiFi SSIDs.
- Check the box next to the AP’s SSID (e.g., “BlockA_AP”) and click ‘Next.’
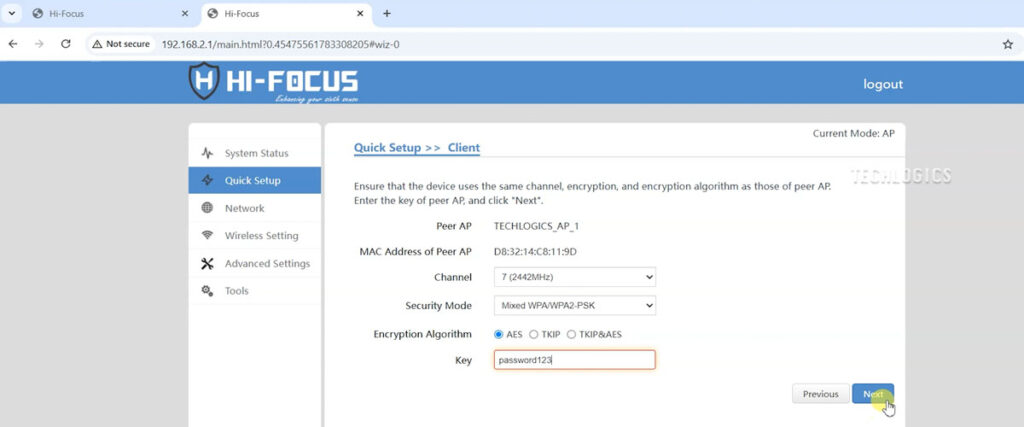
- Enter the AP’s WiFi password and click ‘Next.’
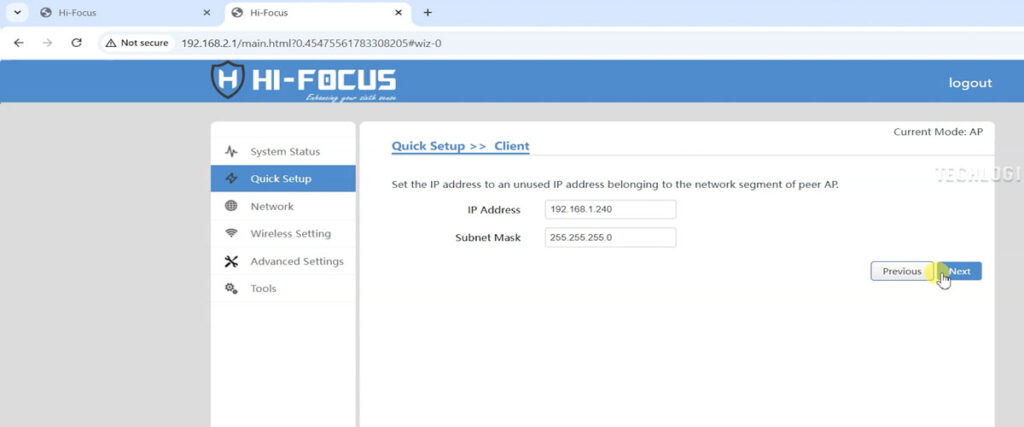
- Adjust the Client CPE’s IP if needed (e.g., 192.168.1.240) to align with your network.
- Click ‘Next’ and ‘Save.’ The CPE will reboot.
Step 5: Install and Connect
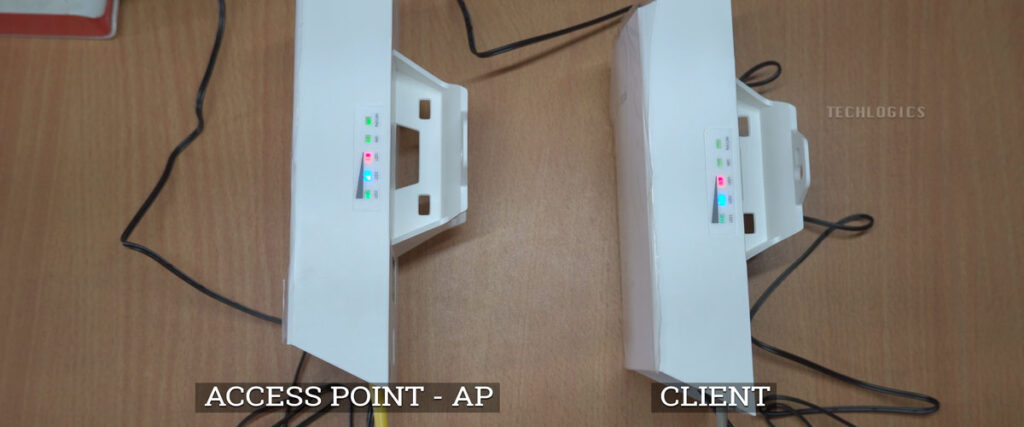
- Mount the Access Point in a spot with a clear line of sight to the Client CPE.
- Position the Client CPE to receive the AP’s signal effectively.
- Connect the AP’s LAN cable to your router or network switch to integrate it into your home network.
- Set your PC’s LAN to obtain an IP dynamically (DHCP) for seamless access to all devices.
Step 6: Verify the Connection
- Check the Signal LEDs:
- Stable LED on AP: Confirms proper AP operation.
- Blinking LED on Client: Indicates active signal reception from the AP.
- A stable AP LED and blinking Client LED ensure a robust wireless link.
Done! Your Client CPE is configured and connected.

Finalizing the Setup
With both CPEs configured, install them in their designated locations. The Access Point should transmit its WiFi signal effectively, while the Client CPE receives it reliably. Connecting the AP to your router integrates the setup into your home network, allowing all devices to communicate seamlessly.

By setting your PC to DHCP, you ensure flexibility and easy management of your network. The Signal LEDs provide visual confirmation of a successful connection, giving you confidence in your setup’s reliability.
Wrapping Up
Thank you for following this guide! We hope it simplifies your Hi-Focus HF-CPE01 configuration for outdoor point-to-point connectivity. Whether you’re setting up surveillance or extending internet access, this manual method offers a secure and dependable solution. If you found this helpful, please like, share, and subscribe for more content. Your support keeps us motivated to bring you more great tutorials. See you next time!


