Welcome to TECH LOGICS! In this tutorial, part of our Hikvision DVR Access Video Series, we’ll guide you through the process of remotely accessing your Hikvision DVR-attached cameras using the iVMS-4200 software from anywhere in the world. In our previous tutorial, we covered how to connect to your DVR locally within a LAN network for live viewing and playback. Now, we’ll show you how to take it a step further with remote access.
Prerequisites for Remote Access
Before diving into the iVMS-4200 configuration, ensure the following:
- Your DVR has the Hik-Connect feature enabled and is added to your Hik-Connect mobile app.
- You have your Hik-Connect login credentials (username and password) ready.
- If you don’t have a Hik-Connect account, refer to our previous tutorial on adding a Hikvision DVR to the Hik-Connect mobile app (link in the description).
Let’s get started!
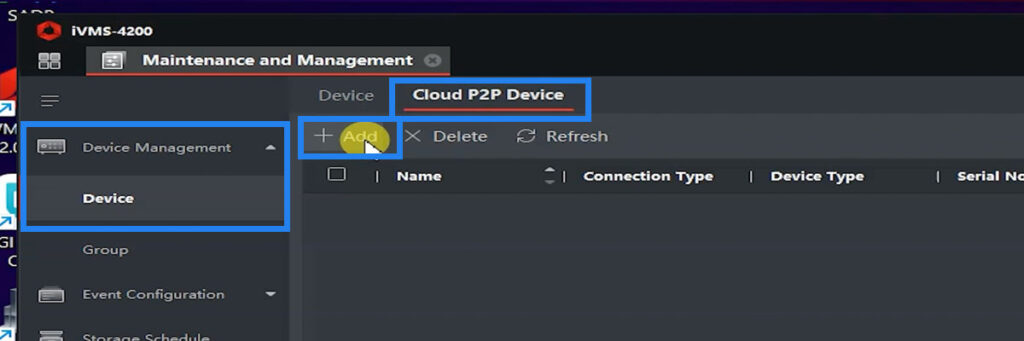
Step 1: Add Your Hik-Connect Account to iVMS-4200
- Open the iVMS-4200 software and navigate to the Device Management section.
- Under the Device tab, locate the Cloud P2P Device option.
- Click on Cloud P2P Device to open the Add Device screen.
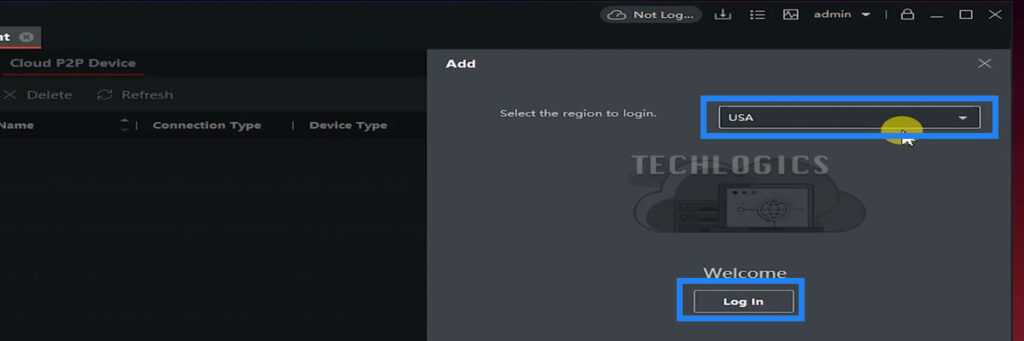
- On the Add Device screen, enter your Hik-Connect account credentials (username and password).
Selecting the Correct Region
- Choose the same region configured in your Hik-Connect mobile app to ensure a smooth connection.
- If you’re unsure about your region, open the Hik-Connect mobile app, go to the Me section (bottom right), and tap your account name at the top to view your account details, including the region.
- After selecting your region, click the Login button.
Linking Your Account
- Enter your Hik-Connect username and password (the same ones used in the mobile app).
- Logging in will securely link your iVMS-4200 software to your Hik-Connect account, automatically fetching and displaying all cameras associated with your account.
- Your cameras are now ready for live viewing and management within iVMS-4200.


Step 2: Verify Your Device
Once logged in, your linked devices will appear under the Cloud P2P Devices page in iVMS-4200. If you’re not adding new devices, click Cancel to exit the setup.
When selecting a camera for live streaming, you may be prompted to enter the Device Verification Code. To find this:
- Access your Hikvision DVR’s settings via a connected monitor or TV.
- Navigate to the Configuration menu, then select the Network tab.
- Choose Platform Access to view the Device Verification Code.
- Enter this code into iVMS-4200 to complete the setup and unlock live view and other features.


Step 3: Viewing Live Feeds
- To view a single camera, select its window in iVMS-4200.
- To monitor multiple cameras simultaneously, click the group name corresponding to all cameras. This displays multiple live feeds on one screen, perfect for monitoring several areas at once.

Step 4: Accessing Recorded Footage
To view recorded footage:
- Go to the Remote Playback menu in iVMS-4200.
- Select a camera from your device list.
- Use the timeline bar at the bottom to navigate through footage by dragging left or right.
- Click the calendar icon to select a specific date and locate recorded videos from that day.
Step 5: Logging In and Out
- If you close iVMS-4200 without logging out, you can access your cameras without re-entering credentials.
- If you log out and restart the software, you’ll need to re-enter your Hik-Connect credentials to re-authenticate and retrieve your devices.
Troubleshooting Tips
- Forgot your region or username? Check the Me section in the Hik-Connect mobile app for your account details.
- Connection issues? Ensure the region selected in iVMS-4200 matches the one in your mobile app.
What’s Next?
Explore more features of iVMS-4200 and Hikvision DVRs by checking out other tutorials in our video series. If you found this guide helpful, please like, share, or subscribe to our channel to support us in creating more valuable content!
Thank you for following along, and happy monitoring!


