In the world of home security, integrating different devices seamlessly can enhance your surveillance capabilities. One common scenario involves adding a V380 WiFi camera to a TP-Link VIGI Network Video Recorder (NVR) using the ONVIF protocol. If you’re wondering how to achieve this, you’re in the right place! In this comprehensive guide, we’ll take you through the step-by-step process to ensure a smooth setup.
Ensuring Connectivity
Before diving into the setup process, ensure that both your V380 WiFi camera and TP-Link VIGI NVR are connected to the same local WiFi or LAN network. This is crucial for establishing communication between the devices.
Enabling ONVIF Protocol on Your V380 Camera
- Accessing V380 Pro App: Open the V380 Pro app on your smartphone or device.
- Enabling ONVIF or RTSP Protocol: Navigate to the settings menu of your V380 camera and enable the ONVIF or RTSP protocol. Note: Some models may require additional steps to unlock this feature.
- Setting Static IP: Configure a manual static IP address for your V380 camera within your network settings. This prevents IP conflicts and ensures stable connectivity.
Configuring Your V380 Camera
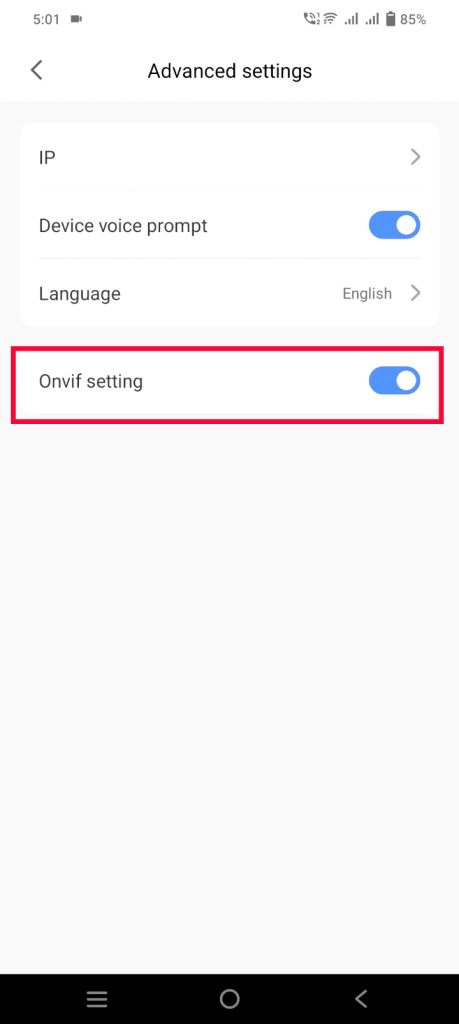
- Accessing Advanced Settings: Navigate to the advanced settings menu on your V380 camera.
- Enabling ONVIF: Locate the ‘ONVIF Settings’ and enable this feature. You’ll receive a confirmation message upon successful activation.
- Setting Manual IP: Within the advanced settings, select the ‘IP’ option and choose manual settings. Enter the IP address according to your router series to maintain consistency.
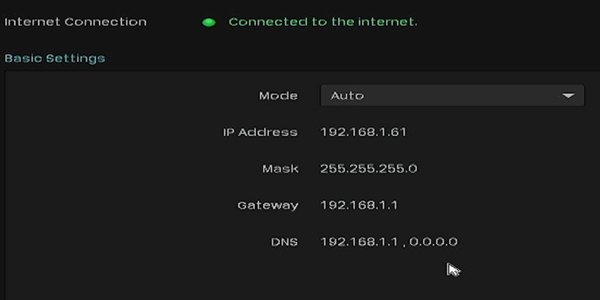
You can choose the camera IP and server address according to your NVR’s IP address. You can find the NVR’s IP address in your NVR settings, under the ‘Network’ option.
For example, if the NVR device IP address is 192.168.1.61, you can set your camera IP address with the last value starting from 62 and above.

For us, we have set the IP address as 192.168.1.133, with the other values configured according to the NVR network.


Adding the Camera to Your TP-Link VIGI NVR
- Logging into NVR: Access your TP-Link VIGI NVR using the admin account credentials.
- Navigating to Camera Settings: Once logged in, navigate to the settings menu and select the ‘Camera’ option.
- Detecting Cameras: Utilize the ‘Refresh’ button to detect cameras on the network. If your V380 camera is detected can be added by clicking the ‘+’ icon to connect it.
- Manual Addition (if necessary): In case the camera is not detected automatically, opt for manual addition by clicking ‘Add Manually’. Enter the V380 camera parameters, including camera’s IP address and make sure the protocol is set to ‘ONVIF’, and the management port for V380 Pro cameras is ‘8800’.


Troubleshooting and Additional Resources
Encounter any challenges during the setup process? Don’t fret! Here are some resources to help you out:
- Video Tutorial: Refer to our video description for a detailed tutorial on enabling the ‘ONVIF’ protocol and troubleshooting connection issues.
- Support Assistance: For personalized assistance, feel free to reach out to our support team. We’re here to ensure your setup is successful.
Conclusion
By following these simple yet comprehensive steps, you’ll seamlessly integrate your V380 WiFi camera with your TP-Link VIGI NVR, enhancing your home security system. Stay connected, stay secure!


