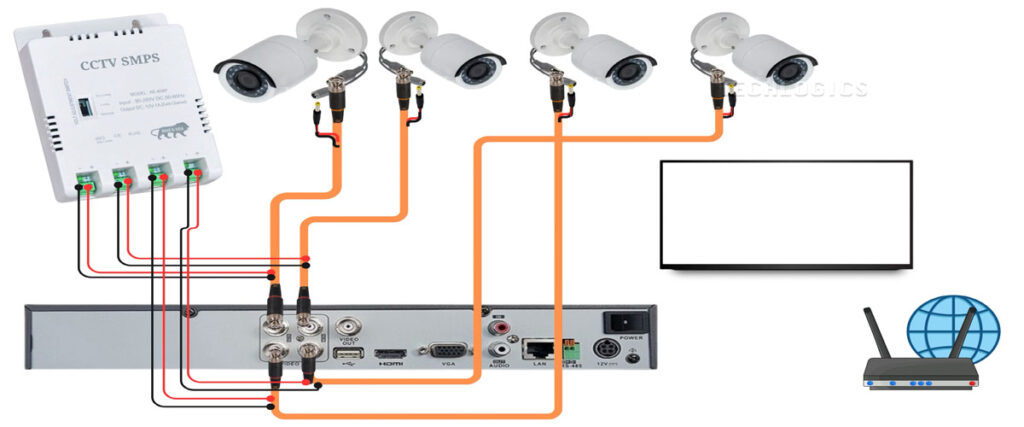
In this detailed guide, we will explore how to properly connect a 4-camera HD analog CCTV system. This step-by-step process will include wiring connections between the DVR, four cameras, the DC SMPS, the display screen, and the internet modem. Alongside our instructions, simple animated diagrams will facilitate your understanding throughout the setup.
Understanding the Components
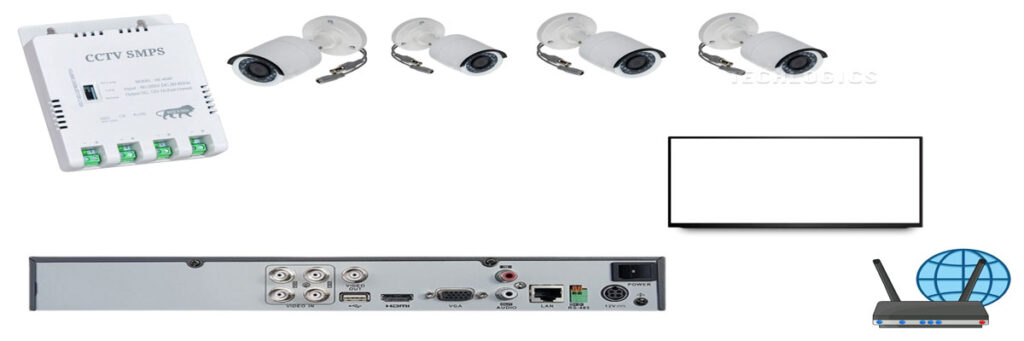
Before diving into the wiring process, it’s essential to familiarize yourself with the components involved in this installation:
- DVR (Digital Video Recorder): This device records and stores video from your cameras.
- Four HD Analog Cameras: These are your surveillance cameras that capture the video feed.
- DC SMPS (Switched Mode Power Supply): This powers the cameras with the necessary voltage.
- Display Screen: To view the live feed from your cameras.
- Internet Modem/Router: Enables remote viewing capabilities over the internet.
Note: The wiring method we will discuss is general enough that it can be applied to any brand of CCTV system.
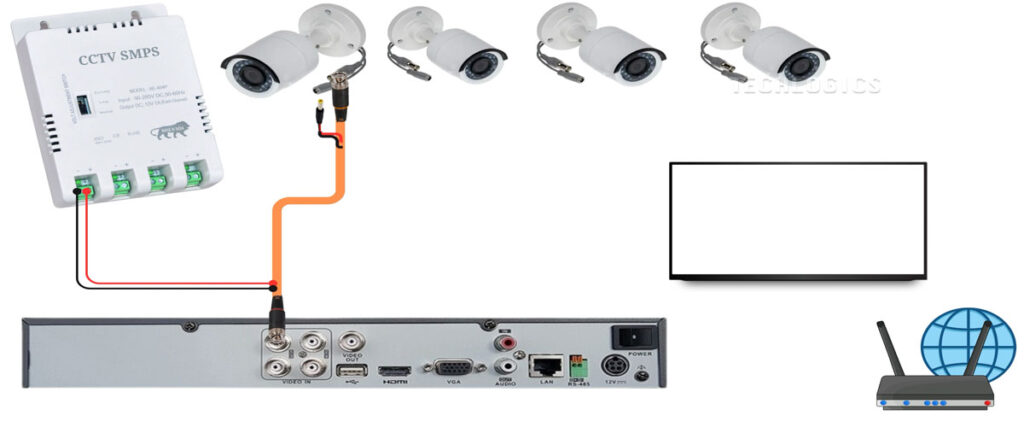
Step 1: Connecting the Cameras to the DVR
We will begin by connecting each of the four cameras to the DVR. For this, we will use 3+1 CCTV cables with BNC connectors. Here’s how to do it:
- Prepare Your Cables: Start with four lengths of 3+1 CCTV cables.
- Connect Cameras:
- Connect one end of each cable to the respective camera.
- Secure the BNC connector to the camera’s video input.
- DVR Connection:
- Connect the other end of each cable to the corresponding video input ports on the DVR.
Step 2: Wiring the Power from the DC SMPS
After establishing the video connections, we now need to power the cameras using the DC SMPS.
- Identify Power Outputs:
- The DC SMPS has multiple output leads suitable for connecting to each camera.
- Connect Power Cables:
- Use the power cables from the SMPS and connect them to each camera’s power terminals.
- Ensure that you match the positive (usually red) and negative (usually black) terminals correctly.
Note: The 3+1 CCTV cable contains three wires dedicated to power and one wire for microphone connectivity. Make sure to use these three wires for the cameras’ power supply only.
Step 3: Preparing Connections at the DVR Side
Next, let’s prepare the connections at the DVR side of the 3+1 cable.
- Color Coding:
- You can use any color coding for the wires, but consistency is key. Always ensure that both ends of the cable match the positive and negative polarity.
- Connecting Wires:
- Strip the wire ends if necessary and connect them to the corresponding terminals on the SMPS.
- Take heed to connect the red wire to positive and black wire to negative.
- Double-Check Polarity:
- As depicted in the corresponding diagrams, always check that you have the correct wiring before proceeding.
Step 4: Connecting to the Male DC Pin
Having set the DVR side, let’s now prepare the other end of the cable for connecting to the male DC pin of the camera.
- Follow Color Codes:
- Follow the same color combination for positive and negative connections as established previously.
- Reference Diagram:
- Use the provided illustrated diagram for clear visibility on how to connect the power wire. Properly matching colors will prevent any electrical issues from reversed polarity. This can potentially damage your cameras or affect their performance.
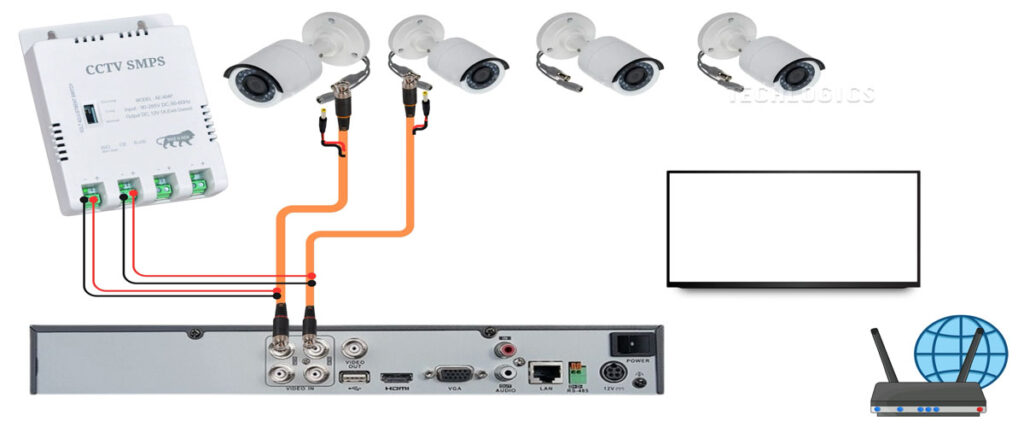
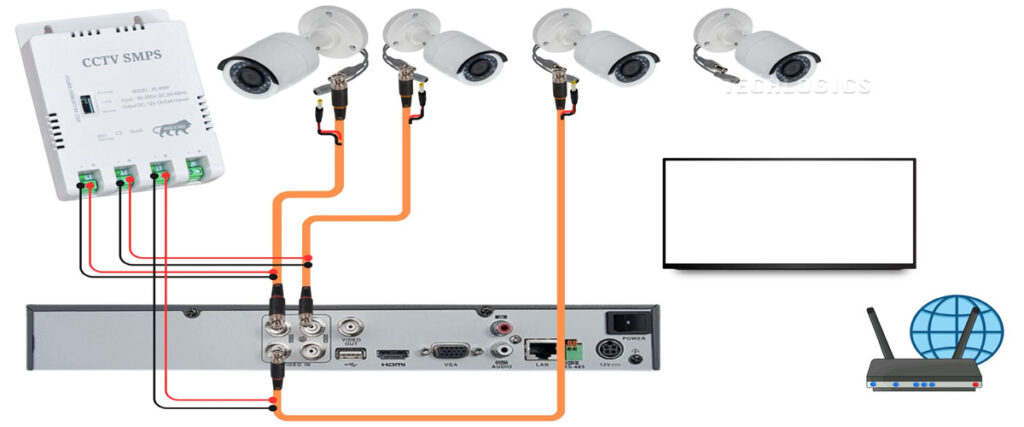
Step 5: Repeat for Remaining Cameras
Now that we’ve connected the first camera, proceed with the same steps for the second, third, and fourth cameras.
- Reiterate Connections:
- Connect each of the remaining cameras to the DVR using the same wiring procedure.
- Ensure that the power connections are also made accurately using the DC SMPS.
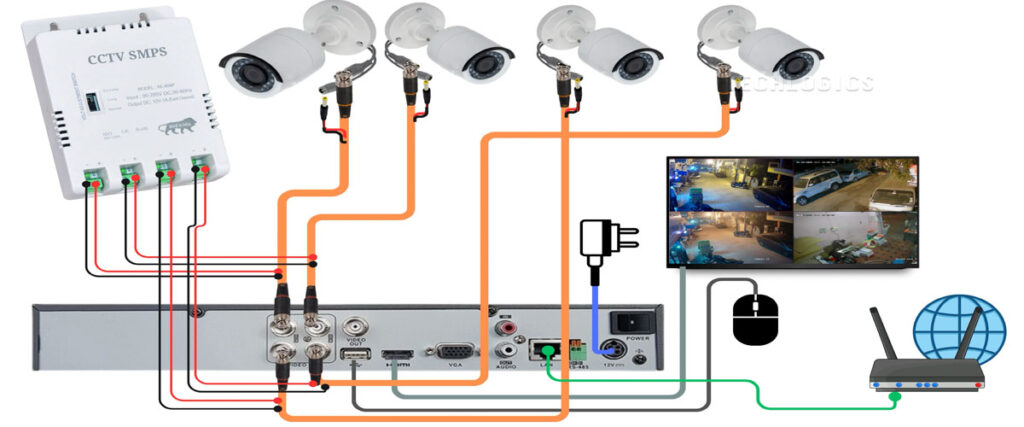
Step 6: Connect Accessories to the DVR
Once all cameras are connected:
- Attach Accessories:
- Connect the DVR power adapter to the DVR.
- Attach the mouse to the DVR for navigation.
- Hook up the display screen to the DVR for monitoring.
Step 7: Establishing Internet Connection
The final step in this process is to connect the DVR to the internet.
- Use a LAN Ethernet Cable:
- Connect one end of the LAN Ethernet cable to the DVR’s LAN port.
- Plug the other end into your internet modem or router. This connection will allow remote access to your camera feeds through a mobile app or PC software.
Final Step: Powering Up Your CCTV System
Once every connection has been made as per the diagrams:
- Turn On the System:
- Press the power button on the DC SMPS to activate the power supply to the cameras.
- Press the power button on the DVR to start the system.
- Check Camera Functionality:
- After powering on, give the system a moment to boot up. The display screen should show the live feed from each of the cameras.
- Verify that all cameras are functioning correctly by checking the video feeds on the DVR display.
- Configure DVR Settings:
- Use the mouse connected to the DVR to navigate to the system settings. Here, you can adjust the camera settings, save the recordings, and set up any desired features such as motion detection or alerts.
- Ensure that the DVR is correctly configured for internet connectivity. You might need to input network settings depending on your router setup.
- Test Internet Connection:
- If applicable, download the mobile app or software associated with your DVR brand. This will allow you to monitor the camera feeds remotely.
- Log into the app or software and verify if you can access the video feeds from your cameras.
- Troubleshooting:
- If any camera feeds are not showing or if there are connectivity issues, revisit each connection to ensure that they are secure and correctly wired. Check for any loose connections or incorrect polarity.
- Ensure that your internet connection is stable and that the LAN cable is securely connected.
Conclusion
Congratulations! You have successfully installed and connected a 4 HD analog CCTV camera system. This setup not only enhances your security monitoring but also provides you with the convenience of accessing the feeds remotely.
We Value Your Feedback!
Thank you for taking the time to read through this comprehensive guide. We hope you find it helpful as you embark on your CCTV installation journey. If you have any questions or run into issues during setup, feel free to reach out in the comments, and don’t forget to share this guide with friends and family who might also benefit from it.
Lastly, be sure to subscribe to our blog for more tutorials and tips on enhancing your home or office technology setup. Your support encourages us to continue creating high-quality content designed to improve your experience with technology!


