In this tutorial, we’ll walk you through the process of initializing your Hikvision IP camera, adding it to the Hik-Connect server, and enabling mobile access from anywhere – all without the need for a laptop or PC.
Note: This method can be used when you don’t have a laptop or PC to configure access to the Hik-Connect mobile app.
Pre-Requisites
Before diving into the setup, make sure your camera and mobile phone are connected to the same LAN or Wi-Fi network. You can choose between:
- A PoE Injector-Splitter Kit
- A PoE Switch
Check your wiring diagram to ensure everything is connected properly.
Additionally, ensure that your internet modem or router has an IP address within the 192.168.1.1 series. By default, your camera’s IP address is 192.168.1.64. Your mobile phone should also be on the same network to successfully activate and configure the Hik-Connect server.

Download the Hik-Connect App
- Open Your Mobile Device’s App Store
- For Android devices, open the Google Play Store.
- For iOS devices (iPhone or iPad), open the Apple App Store.
- Search for the Hik-Connect App
- In the search bar at the top of the app store, type in “Hik-Connect”.
- Ensure that you look for the official app developed by Hangzhou Hikvision Digital Technology Co., Ltd. This will help you avoid downloading unofficial apps.
- Download and Install the App
- Once you find the Hik-Connect app, tap on it to view more details.
- Click the “Install” button (for Android) or “Get” button (for iOS) to start the download process.
- The app will automatically install on your device once the download is complete.
- Open the Hik-Connect App
- After installation, locate the Hik-Connect app on your home screen or app drawer and tap to open it.
- Register for a New Account or Log In to an Existing Account
- Register for a New Account:
- If you are a new user, tap on the “Sign Up” option.
- Fill in the required information, such as your email address, create a password, and agree to the terms of service.
- You may need to verify your email address by clicking a verification link sent to your inbox.
- Log In to Existing Account:
- If you already have an account, enter your email and password in the login fields.
- Tap the “Log In” button to access your account.
- Register for a New Account:
By following these detailed steps, you will successfully download and log into the Hik-Connect app, allowing you to proceed with setting up your Hikvision IP camera and accessing its features remotely.
Activating Your Camera
Once logged in, follow these steps:
- Tap the “+” button on the right side of the homepage to access the menu.
- Select “Show Online Devices” from the menu to find any Hikvision devices connected to your network.
- Your IP camera will appear with an “Activate” label. Tap on it to start the activation process.
- A “Create Password” screen will pop up. Use the default username: admin. For the password, choose a strong mix of uppercase letters, symbols, and numbers, and click “Confirm” once you’re done.


Adding the Camera Locally (Optional, Now not Required)
After activation:
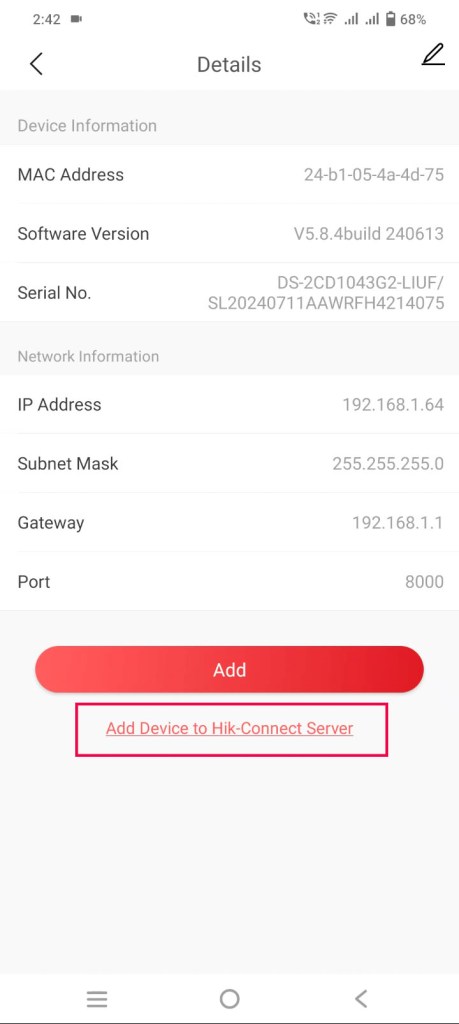
- Proceed to “Add” the camera using its LAN IP.
- Select “Add device to Hik-Connect server” to access the “Network Connection” screen. Confirm the camera’s connection to the internet by selecting “Connected and Next.”
Enabling Hik-Connect Service
- On the “Enable Hik-Connect Service” page, check the box to “Read and Agree” to the terms.
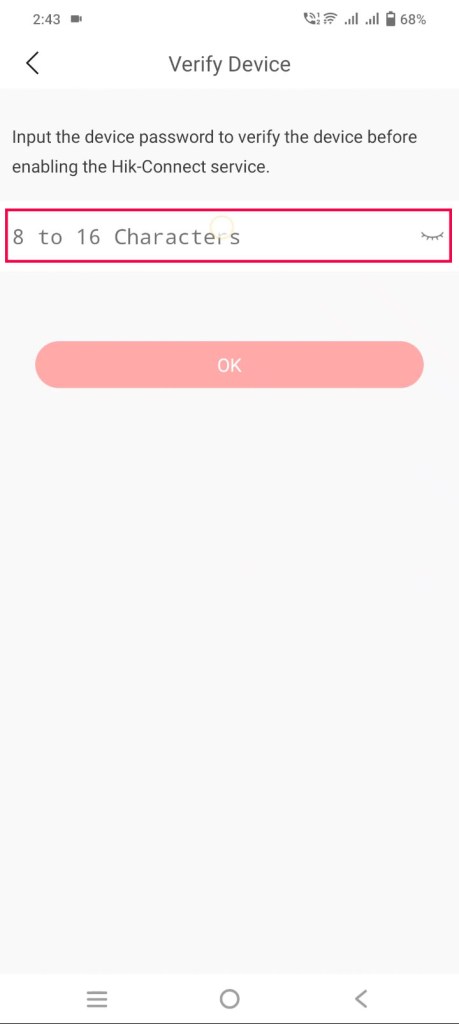
- Click “Next” to go to the “Verify Device” page, where you’ll enter the device password you just created. Click “Ok” to continue.


Creating a Verification Code
- On the “Create Verification Code” page, input your preferred code for video encryption and click “Finish”.
Setting Up Network Configuration
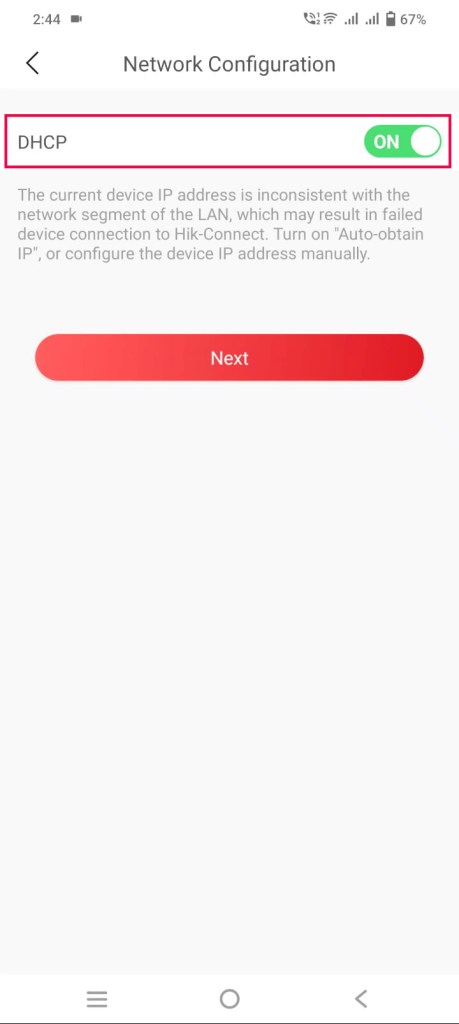
- On the following screen, you can opt for a fixed or dynamic IP address. To simplify the process, enable the “DHCP” option.
- Click “Next”, and you should see the “Adding Completed” page confirming your setup.
Modifying Device Settings
On the “Adding Completed” page, you can modify the device name, date, time, and other authorization settings. After making any desired changes, click the “Finish” button.
Recording Type Configuration
- The “Recording Type” page will open, allowing you to configure the recording option. You can choose between “Event Triggered Recording” or “All Day Recording” based on your needs. After making your selection, click the “Next” button.


Audio Settings
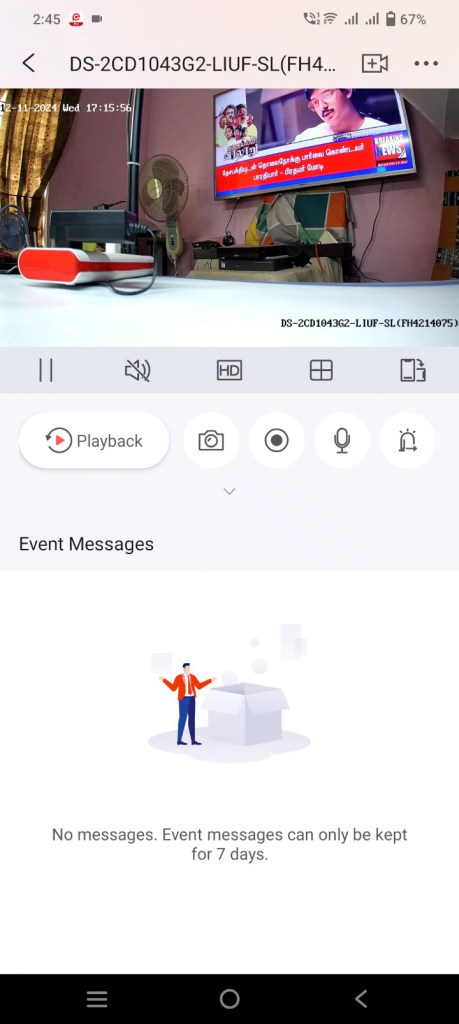
- The “Enable Audio” page will then open. Here, you can enable or disable audio according to your preferences. Once you’ve made your choice, click the “Finish” button to proceed to the Live View page.
Note: If you have installed an SD card, a prompt to format the card may appear here to initialize it. If you haven’t installed an SD card or need more details, please follow this video series, as we explain how to do that in another video.
Accessing Your Camera Remotely
Now that your camera has been successfully added to the Hik-Connect server, you can access it from anywhere using mobile data or any other network. This means you can monitor your camera’s live feed and manage settings remotely, providing convenience and peace of mind no matter where you are.
Explore the Features of Hik-Connect App
The Hik-Connect app offers a range of features that enhance your surveillance experience. You can utilize two-way talk to communicate through the camera, playback recorded footage for review, receive event notifications for any detected activity, and access various other functionalities that ensure comprehensive monitoring of your space.
You can access not only the live view but also a range of advanced features and functionalities. These capabilities will be explained in greater detail in upcoming posts.

Support Us!
If you found this tutorial helpful, please support us by liking, sharing, and subscribing to our channel. Your engagement helps us create more valuable content and share resources with our audience. Thank you for your support—it means the world to us!
Stay tuned for more tutorials to make the most of your Hikvision camera system!


