Are you interested in adding visual output to your electronics projects? In this guide, we’ll walk you through the process of using a 128×64 OLED display with an ESP32 NodeMCU over hardware I2C. Perfect for beginners and DIY enthusiasts, this project will teach you the basics of hardware setup, coding, and troubleshooting.
Components You’ll Need
- ESP32 NodeMCU
- OLED 128×64 Display
- USB Cable
- Connecting Wires
Step 1: Hardware Connections
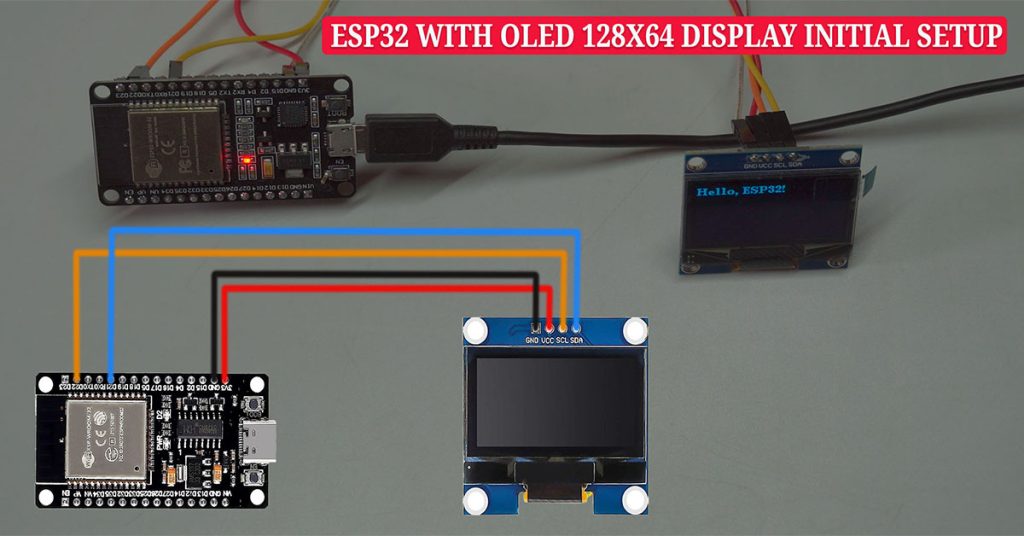
Connect the OLED module to the ESP32 using the following steps:
- Power Connections:
- Connect the VCC pin on the OLED to the 3.3V pin on the ESP32.
- Connect the GND pin on the OLED to a GND pin on the ESP32.
- I2C Data Connections:
- Connect the SCL pin on the OLED to GPIO22 on the ESP32 (default hardware I2C clock pin).
- Connect the SDA pin on the OLED to GPIO21 on the ESP32 (default hardware I2C data pin).
- Secure Connections:
Ensure that all connections are tight. If your OLED module does not have pre-soldered pins, solder them to ensure stability.


Step 2: Arduino IDE Setup
Install the U8g2 Library
- Open the Arduino IDE and go to Sketch > Include Library > Manage Libraries.
- In the Library Manager, search for “U8g2” and install the latest version.
- This library enables communication with the OLED and provides functions to display text and graphics.

Select the Correct Board and Port
- Go to Tools > Board and select your ESP32 model (e.g., “ESP32 Dev Module”).
- Under Tools > Port, select the port where your ESP32 is connected.
Step 3: Writing and Uploading Code
- Load the Code:
Use the U8g2 library to write code that displays text on the OLED. Here’s an example to get you started:
#include <U8g2lib.h>
#include <Wire.h>

// Initialize the display (check I2C address)
// U8G2_SSD1306_128X64_NONAME_F_HW_I2C u8g2(U8G2_R0, /* reset=*/ U8X8_PIN_NONE);
U8G2_SH1106_128X64_NONAME_F_HW_I2C u8g2(U8G2_R0, /* reset=*/ U8X8_PIN_NONE);

void setup() {
  u8g2.begin();
  u8g2.clearBuffer();
  u8g2.setFont(u8g2_font_ncenB08_tr); // Choose a font
  u8g2.drawStr(0, 10, "Hello, ESP32!");
  u8g2.sendBuffer(); // Send to display
}

void loop() {
  // Nothing in loop
}- Verify and Upload:
- Click the Verify button to compile your code.
- Once the code compiles successfully, click Upload to transfer it to the ESP32.

Step 4: Troubleshooting Display Issues
If the OLED display shows missing text or a vertical line at the screen’s edge, you might be using an incompatible driver. Many OLED displays use the SH1106 controller instead of SSD1306.
Update the Driver in Code
- Comment Out the Original Line:
// U8G2_SSD1306_128X64_NONAME_F_HW_I2C u8g2(U8G2_R0, /* reset=*/ U8X8_PIN_NONE);
- Uncomment the New Line for SH1106:
U8G2_SH1106_128X64_NONAME_F_HW_I2C u8g2(U8G2_R0, /* reset=*/ U8X8_PIN_NONE);
- Recompile and Upload:
After making the change, compile and upload the code again. This should resolve the issue.

Step 5: Testing Your OLED
Once the upload is complete, your OLED display should work perfectly, showing text or graphics as intended. If you encounter further issues, double-check your wiring and driver setup.
Additional Resources
Explore more projects and in-depth tutorials in our video series, where we cover advanced OLED features, coding techniques, and creative ideas for electronics projects.
Support Our Channel
If you found this guide helpful, consider supporting us:
- Like, Share, and Subscribe to our YouTube channel for more tutorials.
- Your support enables us to create valuable content for the community.
Thank you for joining us on this journey to mastering the 128×64 OLED display with ESP32!


