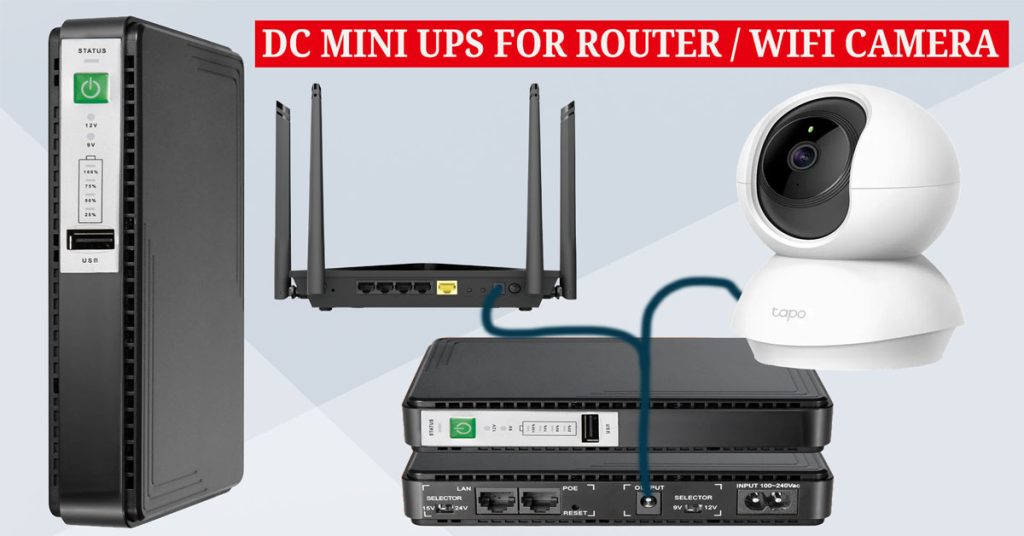
In this colorful and informative blog post, we’re excited to share our unboxing experience of the AR-MINIDC-3 Mini DC UPS! This innovative device is specifically designed to provide power to WiFi routers, modems, and set-top boxes, ensuring that you stay connected even during power outages. Let’s dive in and explore everything this mini UPS has to offer, along with a step-by-step guide on setting it up!
What’s Inside the Box?
Upon opening the package, you’ll find a well-organized assortment of components:
- The AR-MINIDC-3 Mini DC UPS: The star of the show!
- Power Cable: For charging the UPS directly from an AC outlet.
- Output Y Cable: This handy cable allows you to power two devices simultaneously.
- Bridge Connectors: Two of these are included for enhanced compatibility with various devices.
Buy Online : AR-MINIDC-3 Mini DC UPS
Impressive Battery Life
Equipped with a robust 8800mAh battery, the AR-MINIDC-3 Mini UPS provides up to 8 hours of backup power for a single connected device, like your WiFi router or modem. This feature is invaluable during extended outages, ensuring that your essential devices remain operational without any interruptions. With this backup power, you can continue browsing, streaming, or working online without a hitch!
Versatile Power Outputs
This mini UPS supports a variety of power outputs, including:
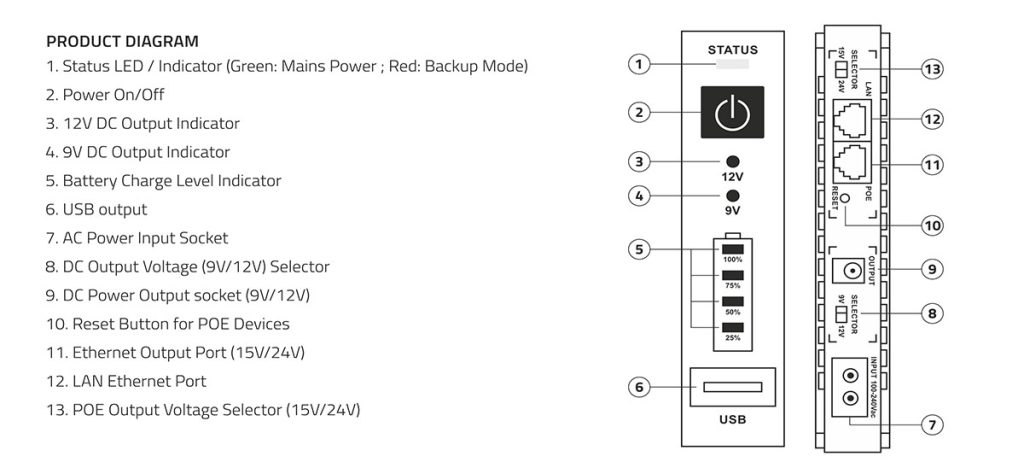
- 9V or 12V (1 to 2A) for routers and modems
- POE output (15V or 24V)
- USB output up to 1.7A, allowing you to charge multiple devices at once.
Keeping Track of Power Levels
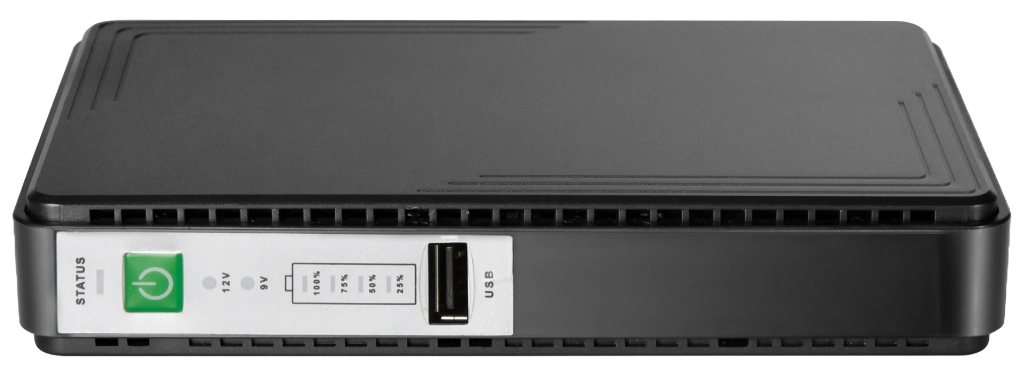
The built-in battery indicator is a fantastic feature that allows you to check the charge and backup level at a glance. No more guessing how much power you have left! You’ll always be aware of your remaining battery, ensuring you’re never caught off guard during an outage.
Micro Load Detection for Uninterrupted Power
One of the standout features of this UPS is its micro load detection capability. This technology prevents cut-off for low-power devices, like WiFi routers, guaranteeing that you maintain a stable internet connection even when the main power is lost.
Seamless Compatibility with Leading Brands
Designed to work seamlessly with popular brands such as TP-Link, D-Link, Netgear, Cisco, and Asus, this UPS ensures that you can switch between main power and battery backup without any lag. You’ll enjoy smooth transitions and uninterrupted connectivity!
Step-by-Step Setup Guide
Charging the UPS: To begin, connect the power cable to the UPS input port and turn on the AC power. The status indicator will glow green, and you’ll see the battery charging level displayed in percentage. This way, you can monitor the charging progress until it reaches full capacity.
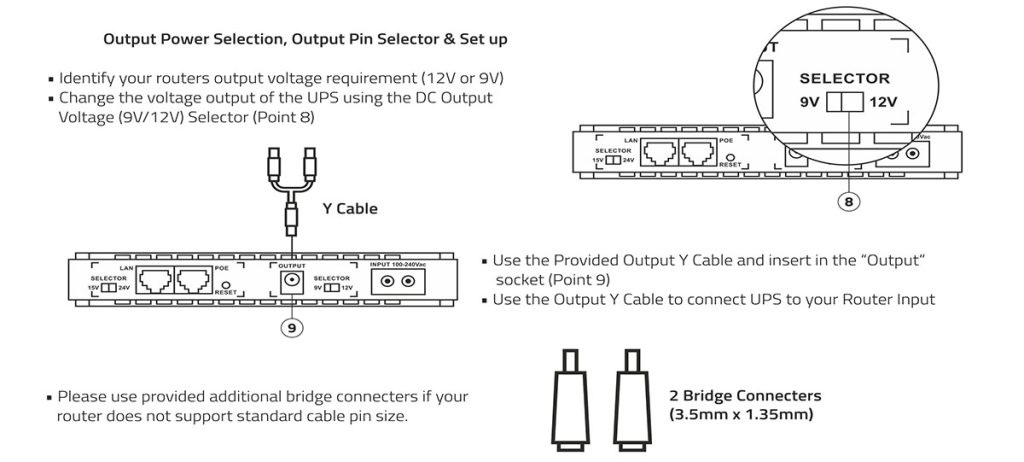
Connecting Your Devices: Before connecting your devices, make sure to select the correct DC output based on your device’s power requirements. For example, if you’re using a 12V modem, set the UPS to output 12V using the selector switch. Connect the provided output Y cable to the UPS’s DC output port, allowing you to power up to two devices simultaneously.
The Y cable includes a connector with a mini port pin for smaller DC pin inputs. If your device requires a larger pin size, simply remove the mini port pin adapter from the cable.
Powering On the UPS: After connecting your devices and confirming the output voltage selection, turn on the UPS by pressing the power button located at the front. Hold the button for 2 to 3 seconds to boot up the UPS. You will see the DC 12V or DC 9V LED indicator light up, confirming that the UPS is now in backup mode and supplying power to your devices.

Testing the Backup Power
To test if the UPS is functioning properly, unplug the AC input power. Observe the connected devices; they should continue to operate smoothly without any interruptions. If everything runs perfectly, this confirms that the DC UPS is doing its job effectively!

Important Notes for Users
- For first-time use, charge the device to 100%. This UPS is designed for 24/7 operation, so always keep it plugged into the main power supply to maintain optimal charge levels for backup during outages.
- If a power outage occurs, the status LED will switch from green to red, indicating that the UPS has entered backup mode.
Toggle Power Output
To turn the UPS output ON or OFF, simply press and hold the power button for 2 to 3 seconds. This allows you to control the power output to your connected devices easily.
Connecting Different Voltage Devices
If you need to connect a device that requires a DC 9V power supply, first disconnect any currently connected devices from the UPS. Toggle the output selector switch to DC 9V and connect your 9V devices to ensure they receive the appropriate power output.

If you found this video helpful, please consider supporting us by liking, sharing, or subscribing to our channel. Your support enables us to create more content and provide valuable resources to our audience. Every bit of support is greatly appreciated! Thank you for joining us on this journey toward reliable power backup solutions!
