Welcome back to TECH LOGICS, your trusted guide for mastering Prama CCTV setups! In this part of our Prama camera setup series, we’re diving into the essential process of downloading and installing the Prama Web Plugin. This plugin is your key to unlocking smooth live feeds, advanced configurations, and pro-level features for your Prama cameras or NVRs directly through your web browser. Whether you’re a beginner or a seasoned installer, this step-by-step guide will make the process a breeze. Let’s get started!
Why the Prama Web Plugin Matters
The Prama Web Plugin is critical for anyone looking to manage their Prama CCTV system via a browser. It enables seamless access to live video feeds, playback recordings, and advanced settings like video adjustments, network configurations, and firmware updates. Without it, your browser-based control of Prama devices—such as IP cameras, DVRs, or NVRs—won’t function properly, limiting your ability to monitor and manage your system remotely.
Step-by-Step Guide to Downloading and Installing the Prama Web Plugin
1. Locate the Plugin
Start by visiting the official Prama India website (pramaindia.in) and navigating to the “Downloads” or “Support” section. Alternatively, access your device’s web interface by entering its IP address in your browser and logging in with your admin credentials. Look for the plugin download link there.
If you can’t find the plugin on the Prama website, check trusted sources like servius.in or other verified links (e.g., bestcctvsolution.com or MediaFire, as noted in recent tutorials from 2025). For convenience, we’ve included a verified download link in the description below.
Note: The plugin often comes in a ZIP file. You’ll need to extract it to access the installer file (typically ending in .exe).
2. Extract the ZIP File
Once downloaded, locate the ZIP file in your downloads folder. Right-click and select “Extract All” (on Windows) or double-click to unzip (on Mac). Choose a destination folder, like your desktop or downloads, to extract the contents. Inside, you’ll find the installer file (e.g., PluginSetup.exe).
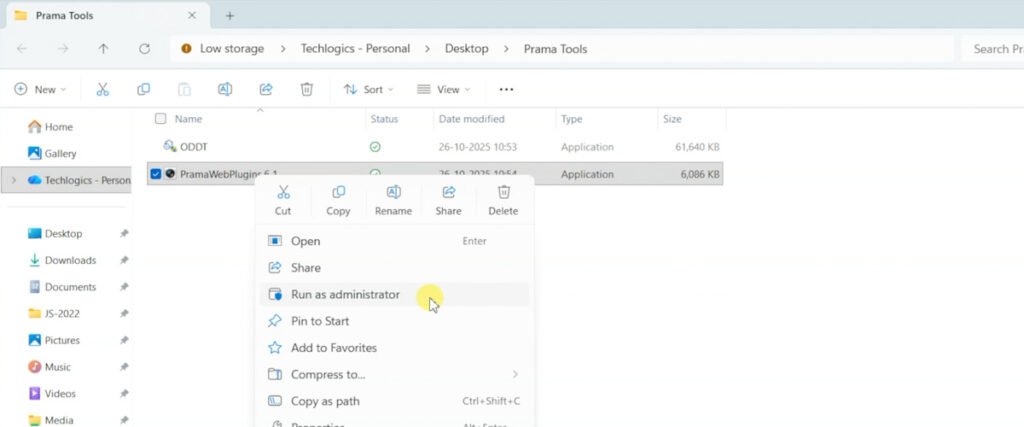
3. Install the Plugin
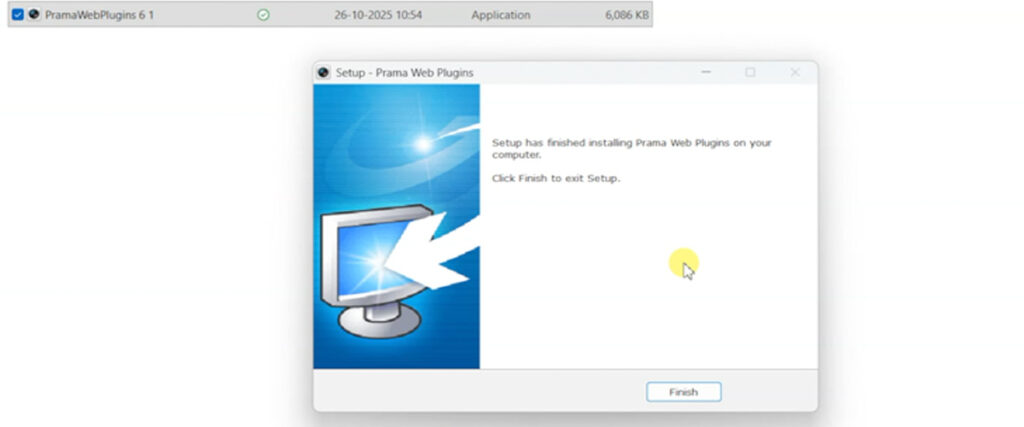
Before installing, close all web browsers to avoid compatibility issues. Right-click the .exe file and select “Run as Administrator” to ensure proper permissions. Follow the on-screen instructions in the setup wizard. You may need to enter your system password to authorize the installation.
If a Windows security warning pops up, don’t worry—it’s common with new software. Click “More Info” and then “Run Anyway” to proceed safely with the verified file.
4. Launch Your Browser
Once installation is complete, open your preferred browser—Google Chrome or Microsoft Edge work best for Prama’s plugin. This ensures the plugin integrates correctly for smooth streaming and functionality.
5. Access the Camera’s Web Interface
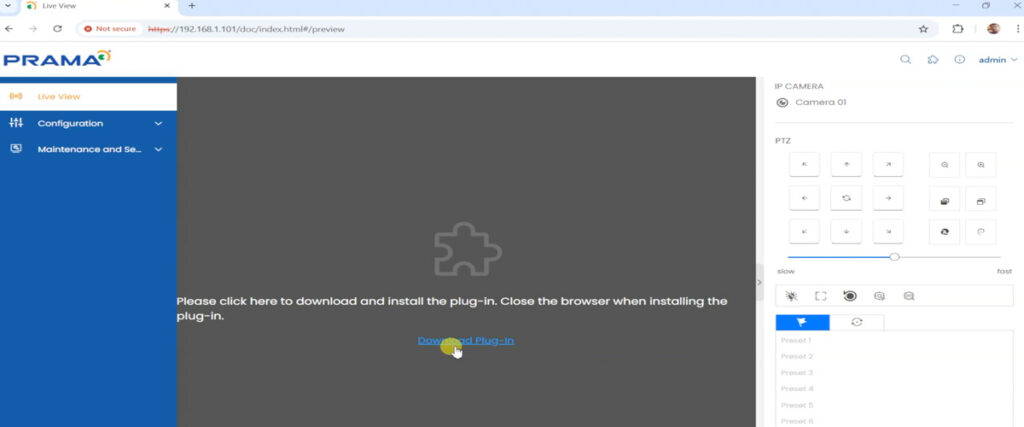
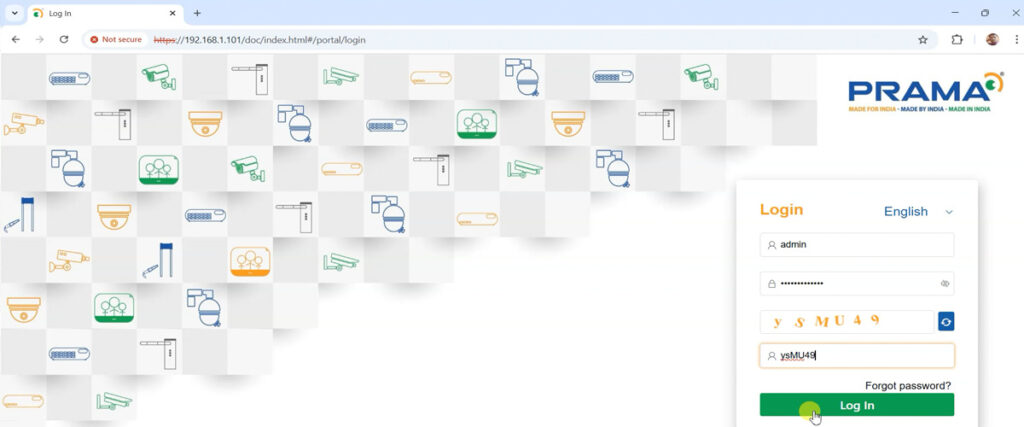
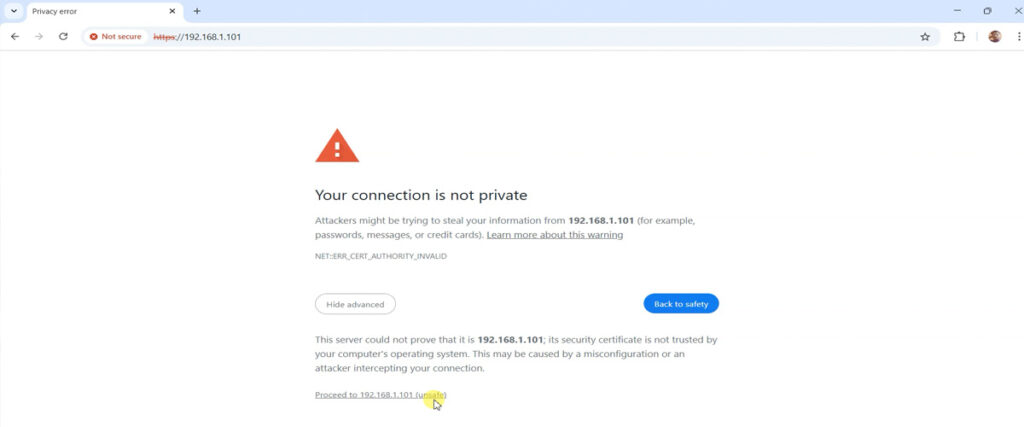
Return to your camera’s web interface by typing its IP address (e.g., 192.168.1.101) into the browser’s URL bar and hitting Enter. If a security warning appears, click “Advanced” and select “Proceed to the IP address.” This is typical for local network devices and safe to continue.
Log in using “admin” as the username and the password you set during device activation. Once logged in, you’re ready to explore live feeds, adjust settings, or manage your Prama camera like a pro!
Troubleshooting Live View Issues
In some cases, the live view may not display properly if the browser window is minimized, especially on laptops with lower screen resolutions. To fix this, maximize the window, and the feed should appear correctly. On a standard desktop or a properly configured laptop, the live view should work seamlessly without resolution-related issues.
Unlocking Pro Features with the Prama Web Plugin
With the plugin installed, your Prama network devices—IP cameras, DVRs, and NVRs—are fully equipped for:
- Live Feeds: Stream high-quality video directly in your browser.
- Playback: Access recorded footage effortlessly.
- Network Settings: Configure IP addresses and other network parameters.
- Firmware Updates: Keep your devices up to date for optimal performance.
- Remote Management: Control your CCTV system from anywhere with an internet connection.
Proper installation ensures these features run smoothly, making monitoring and configuration straightforward and efficient. For mobile access, consider the PRAMA ONLINE app, available on Google Play, as a complementary tool for on-the-go management.
Final Thoughts
That’s it! With the Prama Web Plugin installed, you’ve unlocked the full potential of your Prama CCTV system for browser-based control. This essential step simplifies remote management and ensures your cameras operate at their best.
If this guide saved you time or clarified the process, share it with fellow installers, drop your questions in the comments, or subscribe to TECH LOGICS for more CCTV tutorials. Your support helps us create more valuable content! For the latest tools and updates, always check official Prama resources or trusted partners like servius.in.