Welcome to TECH LOGICS! In this guide, we’ll walk you through the process of connecting your Hikvision DVR to the internet and setting up the Hikconnect mobile app for remote access. By following these step-by-step instructions, you’ll be able to view live feeds and playback recordings from anywhere in the world, enhancing your security setup.

Step 1: Connect Your DVR to the Internet
To get started, you’ll need to establish a physical connection between your Hikvision DVR and your network.
- Physical Connection:
- Connect your DVR to your modem or router using an Ethernet cable plugged into the LAN port.
- Power on the DVR to begin the setup process.
- Access the DVR Menu:
- Log in to your DVR using the admin account.
- Right-click on the screen (assuming the DVR is connected to an HDMI display and controlled with a mouse) to access the “Main Menu.”
- Configure Network Settings:
- Navigate to Configuration > Network > General > TCP/IP.
- Ensure the NIC option is set to “LAN” to designate the network interface.
- Enable the DHCP option to allow the DVR to automatically obtain an IP address and other network settings.
- Enable the DNS option for proper domain name resolution.
- Click Apply to save the settings, connecting your DVR to the internet for remote access.

Step 2: Enable Hikconnect for Mobile App Access
To access your DVR remotely via the Hikconnect mobile app, you need to enable the Hikconnect feature.
- Access Platform Settings:
- From the “Network” section, go to the Platform Access page.
- Toggle on the Enable Hikconnect option to activate remote access.
- Agree to Service Terms:
- A “Service Terms” page will appear. Review and accept the Hikconnect service terms and privacy policy by following the on-screen instructions.
- Save Configuration:
- Verify that all necessary options, including Hikconnect, are enabled.
- Click Apply to save the settings.
- Check the connection status; it should change from “Offline” to “Online,” indicating the DVR is connected to the Hikconnect server.
- Optional: Set a Verification Code:
- You can change the verification code to something memorable for easier access when sharing or connecting remotely.
- Obtain the QR Code:
- Once configured, a QR code will appear on the screen. This QR code will be used to add your DVR to the Hikconnect app.

Step 3: Download and Install the Hikconnect App
Follow these steps to download and set up the Hikconnect app on your smartphone or tablet.
- Download the App:
- Open the Play Store (or App Store for iOS users) on your device.
- Search for “Hikconnect” and locate the app developed by Hikvision.
- Tap Install and accept any permissions if prompted. The app will download and install automatically.
- Launch the App:
- Once installed, tap Open or find the app icon on your home screen or app drawer.
- Select your region (choosing the correct country ensures optimal performance and connectivity).


Step 4: Log In or Register with Hikconnect
If you already have a Hikconnect account, log in. If not, you’ll need to register.
- Log In (Existing Users):
- On the login screen, enter your phone number or email address associated with your account.
- Input your password and tap Login.
- Register (New Users):
- On the login screen, select the option to register.
- Choose to register with your email or phone number.
- For email registration:
- Enter your email address and create a strong password (mix of letters, numbers, and special characters).
- Complete the captcha verification (e.g., selecting images or typing text).
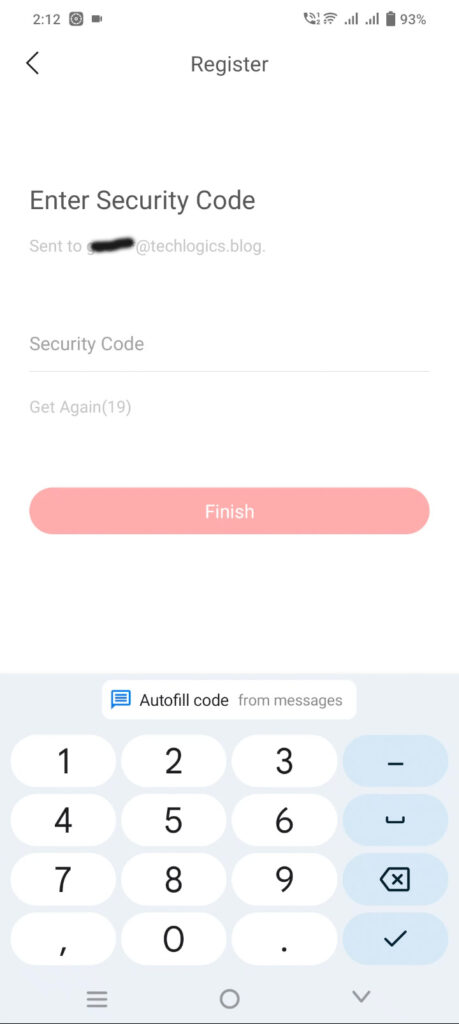
- Check your email for a verification code, then enter it in the app to confirm ownership.
- Optionally, link your phone number for easier logins in the future.
- Enable face recognition or biometric authentication (e.g., fingerprint scanning) for added security if supported by your device.


Step 5: Add Your DVR to the Hikconnect App
Now that the app is set up, add your DVR to enable remote monitoring.
- Access the Add Device Feature:
- From the app’s main screen, tap Add Device or the “+” symbol.
- Select the option to scan a QR code.
- Scan the QR Code:
- Grant the app permission to access your device’s camera and photos.
- Hold your smartphone steady to scan the QR code displayed on the DVR’s platform page.
- The app will automatically recognize the QR code and process the DVR’s identification and configuration details.
- Complete the Setup:
- Follow the on-screen prompts to finalize adding the DVR.
- You may be prompted for “Service provider authorization”; you can skip this step if desired.
- Once added, the DVR will appear in the app’s device list, ready for remote monitoring.


Step 6: Enjoy Remote Access Features
With your DVR successfully added to the Hikconnect app, you can now:
- Live Streaming: View real-time footage from your smartphone or tablet, anywhere in the world.
- Playback: Access and review previously recorded footage with ease.
- Settings Management: Adjust camera settings remotely via the app.
The app works seamlessly over mobile data or Wi-Fi, offering a user-friendly interface for smooth navigation. Note that audio recording is disabled by default but can be enabled if needed.
Additional Tips and Resources
For more in-depth guidance on advanced settings and features, explore additional tutorials in our video series. These resources provide detailed explanations to help you maximize your Hikvision DVR’s capabilities, ensuring complete control and peace of mind.
Support Our Community
If you found this guide helpful, please consider supporting our content creation efforts! Liking, sharing, or subscribing to our channel makes a huge difference and helps us continue providing valuable resources. Thank you for being part of the TECH LOGICS community!