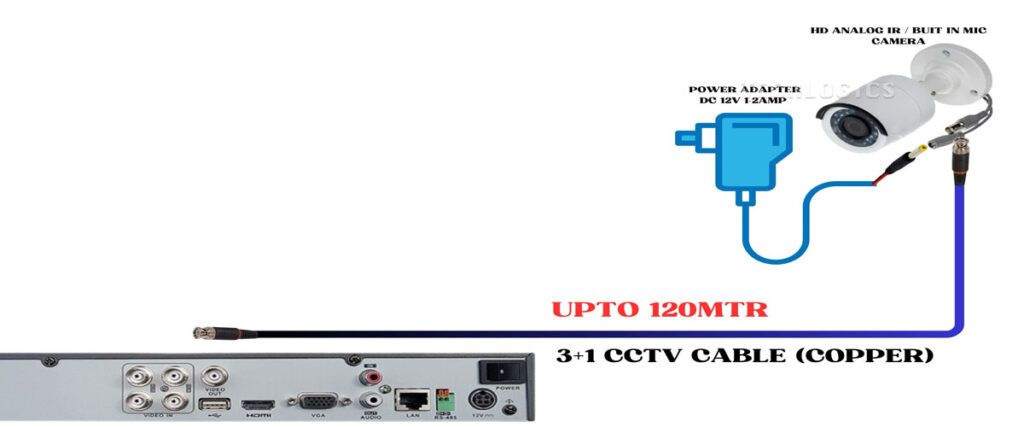
When setting up Analog HD cameras, selecting the proper cable and power supply is crucial for ensuring optimal performance. The 3+1 CCTV cable is a popular choice that supports both power and video transmission, making it ideal for various installations. This comprehensive guide will provide detailed information on using 3+1 CCTV cables at different distance ranges: up to 60 meters, up to 90 meters, and exceeding 100 meters.
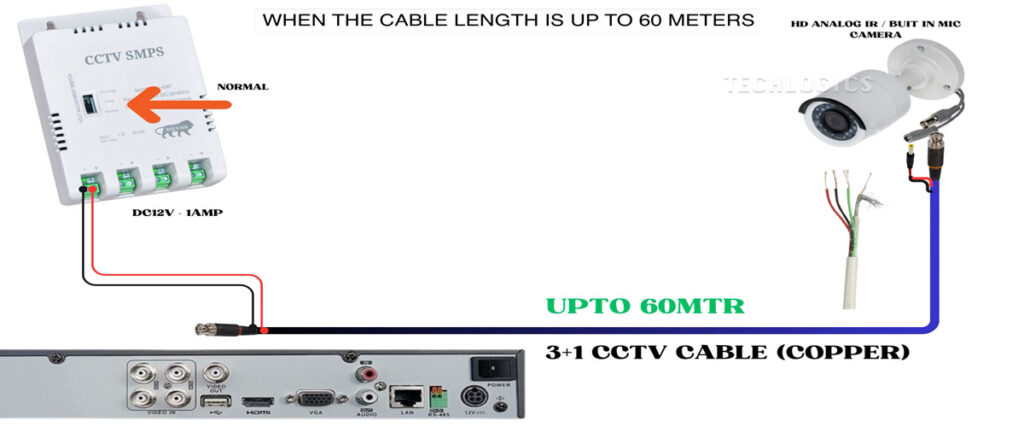
1. 3+1 CCTV Cable for Distances Up to 60 Meters
For installations where the cable length does not exceed 60 meters, the standard 3+1 CCTV cable proves to be highly effective. This cable configuration includes three wires dedicated to power and a coaxial cable for video transmission.
Key Setup Points:
- Cable Structure: The 3+1 CCTV cable comprises three power wires (typically red, black, and yellow) and a coaxial wire for video. For camera installations, only two of these power wires will be used for power delivery.
- Power Supply Connection:
- At the DVR end, connect the two power wires to the SMPS (Switched Mode Power Supply).
- It is crucial to match the positive and negative polarities correctly. For instance, use the red wire for positive and the black wire for negative.
- Maintain consistency in color coding throughout the installation; this step is vital to prevent misunderstandings that could lead to improper connections.
- Camera Connection:
- At the camera end, the cable needs to connect to the male DC pin.
- Ensure you keep the same polarity as designated at the SMPS side when connecting.
- Consistent color coding is ( again ) essential to ensure proper power supply and prevent any electrical issues, including potential damage to the camera.
Expected Performance:
When the cable length remains under 60 meters, the camera will be able to operate effectively, providing crystal-clear images for both day and night vision without the necessity for voltage adjustments.
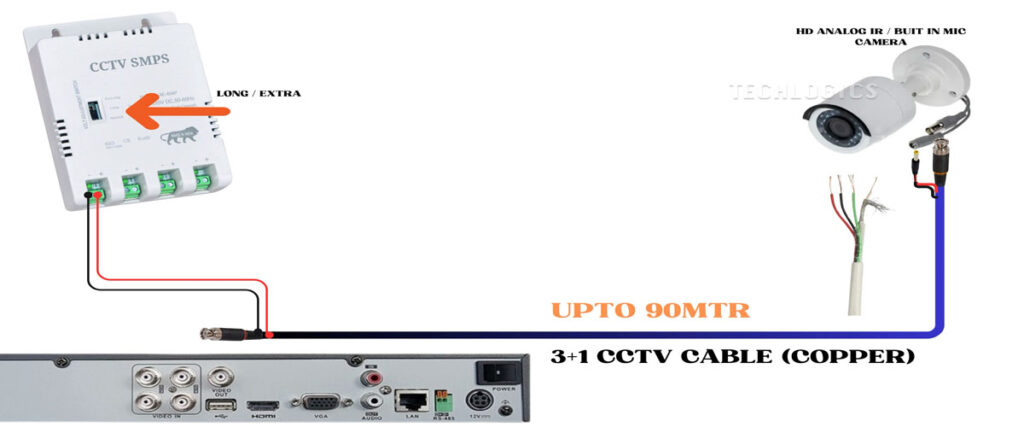
2. Using a 3+1 CCTV Cable for Distances Up to 90 Meters
For runs extending up to 90 meters, a high-quality copper 3+1 CCTV cable is capable of transmitting both power and video signals effectively to the camera.
Key Setup Points:
- Adequate Wiring: Ensure that the copper wiring used is of good quality to support the necessary electrical load over extended distances.
- Voltage Adjustment:
- It might be necessary to toggle the SMPS voltage switch to either “long” or “extra long” to guarantee that the appropriate voltage reaches the camera end.
- This adjustment helps to counteract any voltage drop that could occur due to an extended cable run.
- Power Output:
- Generally, when the SMPS switch is in normal mode, the output voltage per port will stabilize between DC 12 to 13 volts at 1 amp.
- As the power travels through the cable, the voltage can diminish. Upon toggling to “long” or “extra long,” the SMPS can output between 13 to 14 volts.
- When this modified voltage reaches the camera end, it should measure between 12 to 13 volts, which is sufficient for proper functionality.
Expected Performance:
By ensuring the proper voltage is delivered, cameras can function smoothly, providing effective day and night vision for installations within the 70 to 90 meter range. Remember to make the necessary adjustments to the voltage selection switch according to the distance.
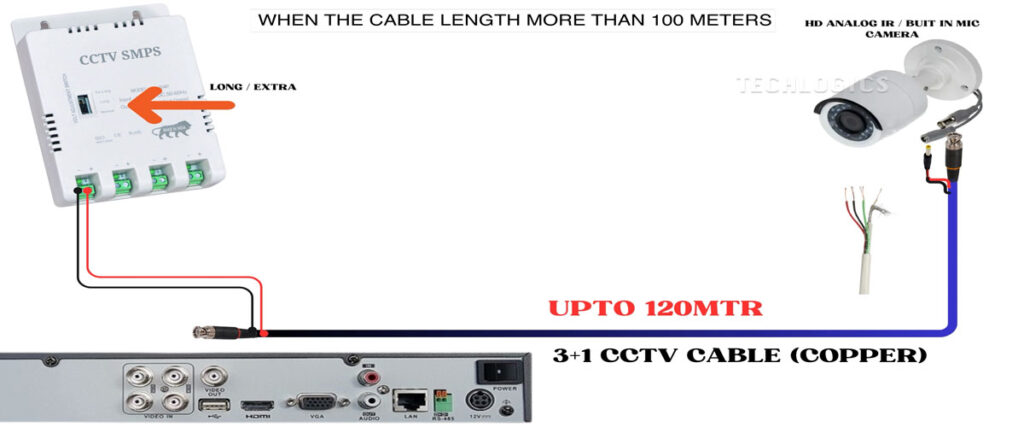
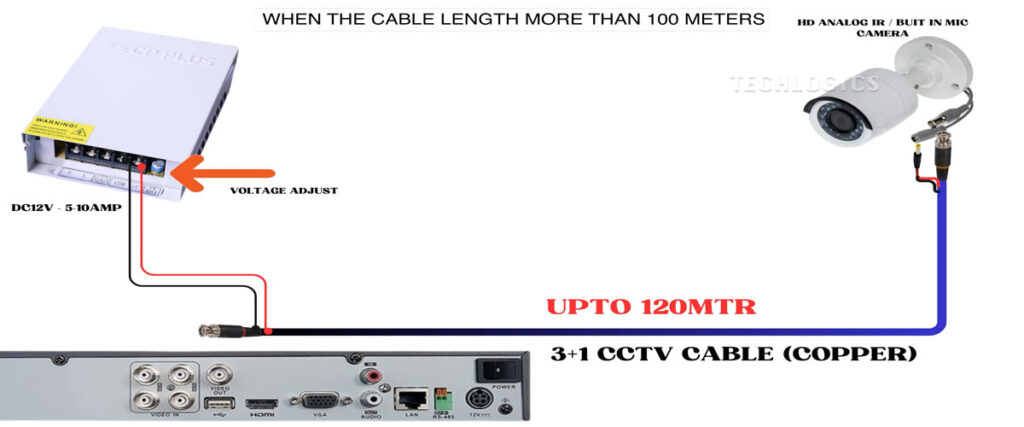
3. For Distances Exceeding 100 Meters
While it is technically possible to utilize a 3+1 CCTV cable for distances exceeding 100 meters, this practice is generally not advised due to inherent limitations in cable gauge. As the cable length increases, efficiency in the transmission of DC power to the camera can be significantly compromised.
Key Setup Points:
- Wire Limitations:
- The power source wire gauge may not adequately support the transmission of DC power over longer distances, leading to subpar performance or failure to operate altogether.
- Voltage Machine Settings:
- If you decide to proceed with the 3+1 cable beyond 100 meters, it is crucial to set the SMPS voltage selection to “extra long,” enabling it to counterbalance the decrease in voltage that occurs due to the extended distance.
- Alternative Cable Recommendations:
- For installations over 100 meters, it is essential to switch to RG6 video cable while also using a separate 0.75 to 1 square mm, 2-core wire specifically for DC power.
- This configuration ensures more reliable power and video transmission, effectively supporting day and night vision capabilities.
Power Supply Considerations:
If, during the operation of the camera, you notice that it is not functioning correctly—particularly in night vision mode where the infrared (IR) LED is active—it may be necessary to consider switching to a different type of SMPS. A suitable option would be a single DC output SMPS rated at DC 12 volts with an output of 5 to 10 amps. This change ensures that the camera receives adequate power, especially when utilizing longer cable runs.
- Adjusting the SMPS Settings:
- Once you’ve selected a higher-rated SMPS, ensure that you set the voltage output according to the camera’s specifications. This is particularly important when running higher current to prevent power drops that can affect performance.
- Utilizing Voltage Adjustment:
- Many SMPS units come with a voltage adjustment knob. After connecting the new power supply, you can use this knob to make slight increases in voltage if necessary. This adjustment can help stabilize the camera’s performance, especially during nighttime operations when the IR LEDs draw more power.
Troubleshooting Tips
If you encounter issues such as distorted images, poor visibility, or a total loss of feed, here are some troubleshooting steps:
- Dedicated Power Source:
- Connect a separate, high-quality DC power adapter directly at the camera’s installation location. Ensure the adapter is rated at DC 12 volts and between 1 to 2 amps. This helps sustain the power needed for effective operation, particularly when the IR LEDs are activated.
- Cable Connections:
- After connecting the adapter, check all connections thoroughly. Ensure the wiring from the SMPS to the camera is secure and that there are no loose or frayed wires. A stable connection is crucial to avoid power loss.
- Quality Check:
- Verify that the installed cables are free from damage and that the copper used is of high quality. Inferior cables can lead to inefficient power distribution and signal loss.
- Evaluate Camera Settings:
- If the camera settings allow, check the configurations to ensure the camera is set correctly for night vision. Sometimes, features may need to be adjusted manually to permit effective nighttime operation.
By following these troubleshooting tips and ensuring proper setup, you can significantly enhance performance, especially for installations that involve longer cable lengths.
Conclusion
Understanding how to effectively use 3+1 CCTV cables is essential for maximizing the performance of your Analog HD cameras. By following the guidelines for different distance ranges—up to 60 meters, 90 meters, and exceeding 100 meters—you can ensure that your installations deliver clear and reliable video feeds, day and night.
If you have any further questions or need assistance with your installation, feel free to explore additional resources or contact a professional for help. Your commitment to ensuring proper configuration will lead to successful outcomes in your security system setups.
Thank you for taking the time to read this guide! We hope it has been informative and valuable in aiding you with your camera installations.


